


Tutorial - How to Create Custom Paragraph Styles for PowerPoint
PPT Productivity PowerPoint add-in's Paragraph Styles features let you quickly save and reuse...
 Lee-Ann
This post is an overview about how to embed fonts in PowerPoint. Although PowerPoint comes with a fairly extensive set of fonts available, you also have the ability to use custom fonts. While it is possible to install and use a font in PowerPoint fairly quickly, there are benefits to embedding fonts for use in PowerPoint which takes a few additional steps.
This post steps you through the key activities for embedding fonts - first to install your custom fonts in PowerPoint, then to embed your fonts in a presentation before sharing it with others. We've also provided steps to help if you would prefer to use custom fonts as your default font for all PowerPoint presentations.
Many larger organizations have custom fonts that have been selected as part of their overall branding strategy. For example, the top tier consulting firms create their own customized branded fonts to maintain a consistent and distinctive visual identity.
Here are a few examples of consulting firms that have their own custom fonts:
Trying to work out how to add fonts to PowerPoint? The most common scenario is when your organization has its own custom font that you are required to use in presentations. But perhaps you're just not satisfied with the options available in PowerPoint by default and found a font that you would prefer. Either way, it's fairly straightforward to use the custom fonts, but a little more involved for updating existing presentations to apply custom fonts.
This is a step-by-step guide on how to import custom fonts into PowerPoint and embed the fonts in PowerPoint presentations. We have also provided links to some of our other blog posts that step you through how to update templates and presentations with custom fonts.
Note - the steps below for installing custom fonts are applicable for individual end users looking to quickly start using a custom font. However if you are working in a large organization and the custom fonts are part of a firmwide brand refresh activity, we recommend liaising with your corporate IT for the rollout of custom fonts. Your IT team can manage the steps for installing custom fonts on behalf of all users in your organization.
Step 1: Obtain the Custom Font Files: First, you need to have the font files for the font that you want to use in your PowerPoint presentation. Font files typically come in two file types - either a TrueType Font (.ttf) or OpenType Font (.otf) file types.
Step 2: Install the Custom Fonts on Your Computer: Before you can use custom fonts in PowerPoint, you need to install the font files on your computer. The steps are slightly different for Windows vs Mac:
Step 3: Restart PowerPoint: After installing the fonts on your computer, close and restart Microsoft PowerPoint to ensure that the new fonts are recognized.
Step 4: Open a blank Presentation to check the fonts. Open a blank PowerPoint presentation once you have restarted PowerPoint (or you can open a presentation that you need to update)
Access the Font Options: From the PowerPoint ribbon at the top of the screen, navigate to the Home tab. In the Font section on the Home tab you will see a drop-down menu showing the current font that is set for your presentation. Click on this drop-down menu to see a list of available fonts.
Find your Custom Font: Scroll through the list of fonts until you see the custom font you installed. If you can see your custom font in the list, it has been successfully installed and is ready for you to use!
Now that you have installed your custom font into PowerPoint, you can use it in the same way as any existing font while the presentation is on your computer. However - if you plan to share a presentation with custom fonts anyone else who does not have the custom font installed on their computer, you need to complete an additional step to embed the custom font into the presentation, before you share it. This is commonly referred to as embedding fonts in a presentation.
To do this:
Step 1: If you have created a PowerPoint presentation that uses your custom font and want to share it with colleagues/ clients/ others, open the presentation.
Step 2: Once the file is open, navigate to the File tab and select Options. This should launch a popup window displaying PowerPoint Options.
Step 3: Select Save from the left hand menu in the popup, and information about 'Customize how documents are saved' will appear (please refer to the screenshot below).
Step 4: Near the bottom of the popup, you will see a Sub heading that says Preserve fidelity when sharing this presentation. Check the checkbox beneath this heading that says Embed fonts in the file.
Step 5: You will see two further options once this box is checked (refer to the screenshot below for guidance). You can either select to embed only the characters used in the presentation, or select to embed all characters.
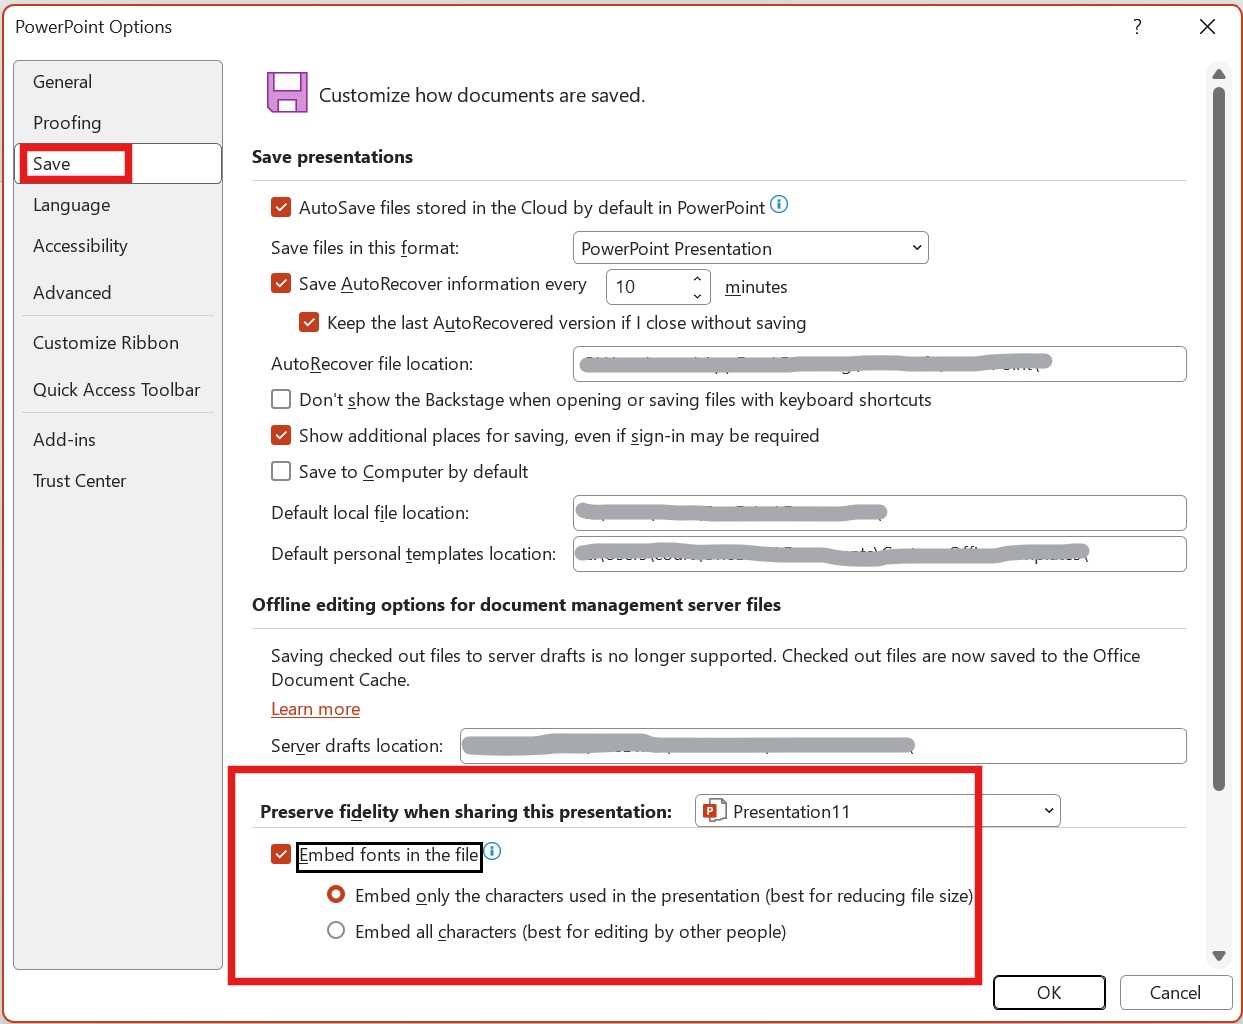
Step 6: Once you have completed this step, save your presentation. You can now share the presentation with others.
We have covered the steps for changing theme fonts in PowerPoint in a separate blog. The process is the same when you are selecting a custom font (once you have installed the custom font onto your computer). We recommend referring to the Changing theme fonts blog post for guidance about using custom fonts in the Slide Master.
If your presentation was created using a PowerPoint template, updating the fonts in the slide master should push the new fonts through all slides. But if a template was not used (or if a template was used incorrectly), you will likely need to update individual slides.
Note that if you have PPT Productivity add-in for PowerPoint, you can use the PPT Productivity Find and Replace Fonts advanced feature to replace all or selected fonts with your custom font across your presentation. The feature also lets you update the Slide Masters, handouts and notes templates all in a couple of clicks.
Here are the options for updating an existing presentation in standard PowerPoint, as well as the steps if you have PPT Productivity add-in
Step 1: Start by updating the Fonts in the Slide Master (refer to the previous section above)
Step 2: Once you have completed the Slide Master updates, close the Slide Master and review your presentation.
Step 3: To fix fonts in any shapes added to slides, you can select the standard PowerPoint Replace fonts feature from the Editing group on the Home Tab
Step 4: In the Replace Font window, open the Replace list to see all the fonts currently used in the file.
Step 5: To replace a font, select its name in the Replace list. Then, in the With list, select the font that you want to use in its place. Select Replace, and then select Close.
This option basically addresses a troubleshooting scenario. Most of the time, your presentation will be using a template. However If a template was not used to set up the PowerPoint presentation you are editing (or if the template has not been used correctly), the steps to update the presentation to use custom fonts are a little different.
If you use PPT Productivity, the Find and Replace Fonts advanced feature will save you a lot of time in this scenario. You can use the feature to replace all or selected fonts with your custom font across your presentation, to change the fonts over to your preferred custom font.
Alternatively if you do not have PPT Productivity, here are the steps:
Step 1: Access the Font Options: Navigate to the PowerPoint slide where you want to apply the custom font. Select the text box or text you want to update to the custom font.
Step 2: Change the Font: From the PowerPoint ribbon at the top of the screen, navigate to the Home tab. In the Font section on the Home tab you will see a drop-down menu showing the current font that is set for your presentation. Click on this drop-down menu to see a list of available fonts.
Step 3: Select the Custom Font: Scroll through the list of fonts until you see the custom font you installed. Click on the custom font's name to apply it to the selected text.
Step 4: Adjust Font Size and Formatting (if necessary): After applying the custom font, you can adjust the font size, color, boldness, italics, and other formatting options using the "Font" section in the "Home" tab.
Step 5: Repeat for Other Text Boxes: If you have multiple text boxes or slides where you want to use the custom font, repeat the process for each of them.
Step 6: Save Your Presentation: Once you're done making changes, be sure to save your PowerPoint presentation to retain the custom font settings.
Remember that when sharing your PowerPoint presentation with others, they will also need to have the custom font installed on their computers or you need to embed the font in the presentation in order for them to see the presentation exactly as you intended (unless you are sharing a .pdf version). If other viewers of your presentation don't have the custom font and you have not embedded it into the presentation, PowerPoint will substitute it with a default font. To learn how to share a presentation with custom fonts see our article How can I share a PowerPoint presentation with custom fonts?
As noted in the earlier section about updating Slide Masters - if you want to use a custom font in all of your PowerPoint presentations (rather than just as a one-off for a specific presentation), updating your PowerPoint Template's theme font is the best solution. Learn how to change the theme font of a PowerPoint presentation in our article How to change theme fonts in PowerPoint.
You cannot change the default font in PowerPoint, but you can change the default font for any templates you create in PowerPoint. Given this constraint, if you want to use a custom font in all of your PowerPoint presentations, creating or updating your PowerPoint Template theme font (to use your custom font) is the best solution. Learn how to change the theme font of a PowerPoint document in our article How to change theme fonts in PowerPoint.
Once you've set the theme font of your presentation, need to save the document as a Template file or .potx in order to use it as the template for future presentations. This will preserve the font as the default font for that template.
To save a PowerPoint presentation as a .potx file;
Step 1: From File at the top left hand side of the PowerPoint ribbon, select 'Save As'
Step 2: Select the location to save the file, enter the File name then select PowerPoint Template(*.potx) from the drop down menu

Step 3: Once you choose PowerPoint Template(*.potx) PowerPoint will automatically change the file location to the default Custom Office Templates folder on your computer. You can navigate to another location, or leave as is. You can now close your document.
Step 4: To use your new template, go to File > New and select the Custom Office Template folder

Click on the Template with the custom font that you have created, then click Create. A new PowerPoint presentation file (.ppt) will open based on the template you have created. Now you can get to work on creating your slides with your custom fonts already set as default.
Learn more about how to create Templates in PowerPoint in our article How to create a PowerPoint template?
Setting a PowerPoint Template as your default Template will increase your efficiency in PowerPoint even more. Once a Template is set as your default, it will open each time you open PowerPoint, and also whenever you select to open a new presentation in PowerPoint.
There are two ways to do this - either in standard PowerPoint, or an alternative way if you use PPT Productivity.
Setting a default template in native PowerPoint without PPT Productivity add-in is a little more complicated, so here are the steps;
Step 1: To set your custom theme as the default, open PowerPoint, select “New” in the left pane, and then click the “Custom” tab.
Step 2: select the “Custom Office Templates” option. Your custom templates will appear. Select the one you want to make the default template.
Step 3: A new window will appear, giving you a preview of the template. Click “Create"
Step 4: A new document will open based on your selected template. Go to the “Design” tab and select the “More” arrow in the “Themes” group.

Step 5: A list of themes will appear. Right-click your custom theme and then select “Set as Default Theme” from the drop-down menu.

Step 6: Now the next time you open PowerPoint, it will automatically begin with this theme.
You can easily set a PowerPoint template as your default, using the PPT Productivity Template Manager.
Step 1: Click on the Template Manager icon on the PPT Productivity Ribbon (please refer to the screenshot below for guidance)

Step 2: In the PPT Productivity Template Manager select the Template you want to set as your default PowerPoint document the check the box 'Set as default'. That's it!

Once your default template has been set, each time you open PowerPoint or open a new document (Ctrl+N), a new presentation file based on this template will open.
Here's a video showing how easy it is to set a PowerPoint Template as the default presentation.
To learn more about the PPT Productivity Template Manager for PowerPoint visit our Manage Templates Feature Page

Start your 30 day free trial - Microsoft Office for Windows
Start Free Trial

