


Troubleshooting PowerPoint Slide Numbering: How to fix common issues
Looking for how to add slide numbers in PowerPoint? Trying to work out what to do when PowerPoint...
This hints and tips post by the PPT Productivity team provides a brief overview of what PowerPoint templates are, as well as a step by step guide for how to create a PowerPoint Template in Office 365. There is also information about how to create PowerPoint themes for templates. Follow this guide and you'll find that it's easy to make a template in PowerPoint!
All PowerPoint presentations are based on a PowerPoint Template. There are a wide variety of existing templates to choose from – Microsoft makes a range available within PowerPoint, your organization may have one (or many), plus many websites now offer them for sale and download.
What if you can’t find a PowerPoint template that meets your needs? You can modify an existing template, or you can create your own PowerPoint presentation template.
If you're looking for more information about exactly what a PowerPoint Template is and how differs from a PowerPoint Theme, please read our related article 'What is the difference between PowerPoint Templates, Themes, and Layouts?'
Creating a PowerPoint Template is easier than you may think. But it's important to take the time to complete all steps and set your template up correctly. A properly built template can save all users of the template hours of time.
Here’s how to create a custom template in Office 365
First - open a blank presentation. Go to the File menu, Select New, then click on the ‘Blank Presentation’ from the list.

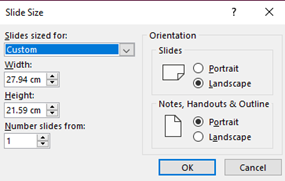
Once you have opened a blank PowerPoint presentation, go to the ‘Design’ tab and select ‘Slide Size’ at the right-hand side of the ‘Design’ ribbon. You have the option to choose Standard 4:3, Widescreen 16:9 or custom sizes. There are also options here to set the height and width of your PowerPoint slides (again, from predefined options or to specify custom), whether you want your presentation to be landscape or portrait orientation, and if you want the slide numbering to start at 0 or 1.
Tip – if your PowerPoint template will mainly be used for online presentations, a widescreen layout is usually preferable. If you will be primarily using the template for presentations that are printed (for example proposal responses or legal documents), the 4:3 layout tends to be the optimal size.
Once you have set the size and orientation of your template, move to the PowerPoint Slide Master. The Slide Master allows you to define the theme for your PowerPoint template. The presentation theme refers to the fonts, colors and layouts for all the slides in your presentation.
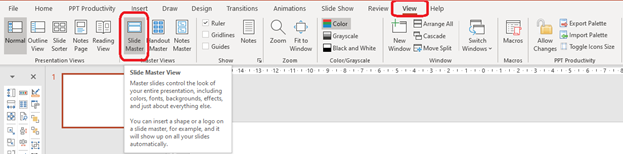
To access the Slide Master of your Template, move to the View tab in PowerPoint, then select the ‘Slide Master’ Icon on the ribbon.
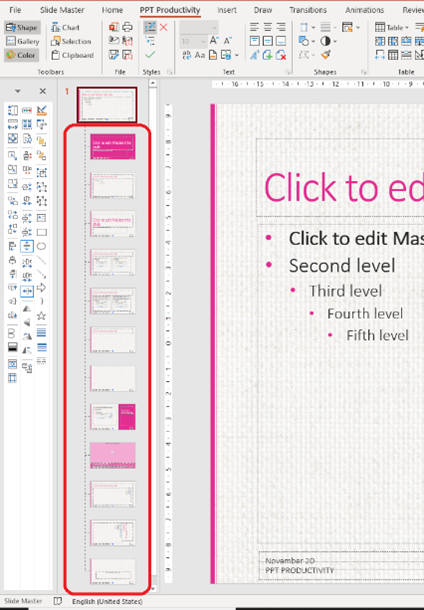
You will now see Master slides/ layouts. The Slide Master/ Parent slide is the first slide that appears, i.e. the thumbnail at the top of the Master Thumbnail pane. Any change you make to the first slide/ layout (technically named the Parent Master) will be replicated in the layouts below it (technically named the Child Masters).
For example, if you add a logo to the PowerPoint parent master, it will appear on all the Child Masters. To make unique changes to individual layouts, select that specific Child Master layout and adjust as needed. Changes made to Child Masters will only affect the individual layout.

Although you can delete ‘child slide’ layouts within the PowerPoint presentation, it's not recommended. Deleting PowerPoint layouts might cause issues for you in the future. Note - the exception to this guidance is if you're editing an existing presentation which has multiple slide master layouts.
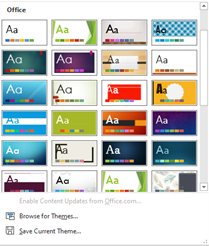
Next you need to choose or create a PowerPoint theme. How to choose a theme for your presentation template? Each theme combines a specified color palette, font style and design. Together these influence the appearance of your presentation.
PowerPoint gives you a number of pre-set themes to choose from. You can use them as they exist, but you can also customize them. Click on the Themes dropdown to reveal all options (refer to the screenshot below for guidance).
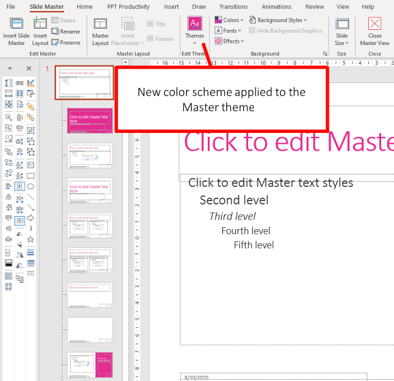
Selecting a new PowerPoint theme changes the default colors you have to work with inside your presentation (allowing you to maintain consistent formatting throughout).
A preview of the new color selection will automatically appear on the PowerPoint Slide Master. Wondering how to change PowerPoint theme colors? If you like the design of a theme, but not the color palette, you can update colors from the ‘Colors’ dropdown menu. The screenshots below show how to select a color scheme.

If you have PPT Productivity PowerPoint add-in, you will also notice the top set of colors on the PPT Productivity Color Toolbar will automatically update to the new color palette you have chosen (skip forward to step 4 if you do not have the PPT Productivity add-in).

Your PowerPOint theme colors will be reflected in all your color drop downs/ fill jug (with pre-populated variants for those colors).
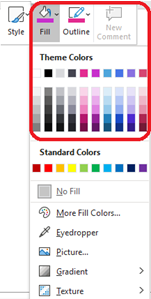
Note: Standard Colors, located at the bottom of the ‘Theme Colors’ Palette cannot be changed.
If there isn’t a color scheme/ palette on the drop-down choices that you like, you can create your own customized palette. For details on how to create your own color palette see ‘How to create a custom color Palette in PowerPoint' article.
Tip: You can update fonts, effects and background styles for templates used throughout the document by selecting those dropdowns from the menu
Read our article 'How do I set or change the theme fonts on a PowerPoint presentation' to learn how to update fonts in your templates.
Now that you have set your fonts and color scheme for your PowerPoint template, it is time to edit the Parent slide. As mentioned previously, any formatting changes you make the Parent slide layout will affect all the slide layouts and therefore all slides in the presentation.
Any design elements you want to include on all your slides should be added to the Parent Slide layout in the Slide Master. Select the pattern or image you wish to use for the background (if any). You can use any image as the background - it could be an image from your device, from a website or one of the many stock images available through Microsoft. We don't usually use background images that cover the entire slide, but for this example I've used one so it’s easy to see the impact. Remember that if you plan to print the presentation, background images covering the slide will use a lot more ink!
To insert the image for your Slide Background, navigate to the ‘Insert’ tab on the PowerPoint ribbon, then the ‘Pictures’ drop down menu and choose the location of your image. E.g., Stock image, then when you have found the image you wish to use, select, and click ‘Insert’.
If your image is not the exact size of your slide, you can resize the image. To resize an image in PowerPoint, select the image on your slide, then click on the ‘Picture Format’ tab on the top ribbon.
Open the ‘Crop’ dropdown, then select ‘Aspect Ratio’. Now choose the aspect ratio that applies to your template. If you are using the widescreen slide dimensions select 16:9. If you have decided to use the ‘standard’ dimensions, choose 4:3.
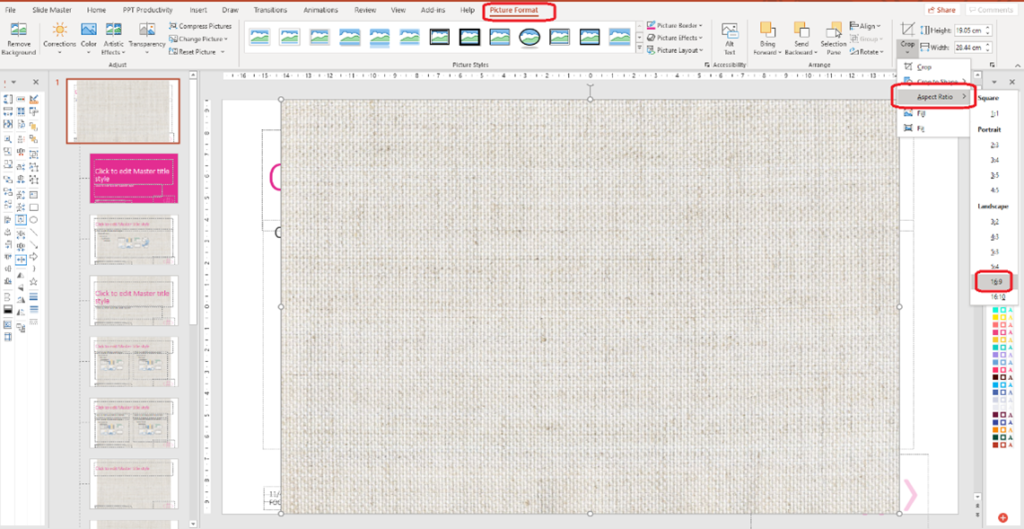
Hit the ‘Crop’ button again to apply the cropped dimensions to the image.
Resizing your image according to the PowerPoint slide dimensions will make it easier to fit to your template without distortion.
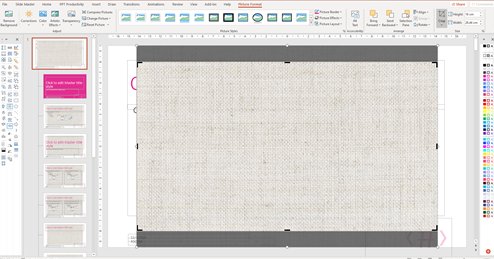
Now make the image the same size as the entire PowerPoint slide. The easiest way to do this is by dragging from the corners of the image, in order not to distort the image.
Send the image to the back so you can see the Parent Slide elements (PPT Productivity users could use PPT Productivity’s Send to back button on the Format Toolbar or select ‘Send to Back’ from the send backward dropdown found on the ‘Picture Format’ tab).
Because we added the picture to the background of the ‘Parent’ slide in the Slide Master Layouts, the image appears on all slides in the PowerPoint template.
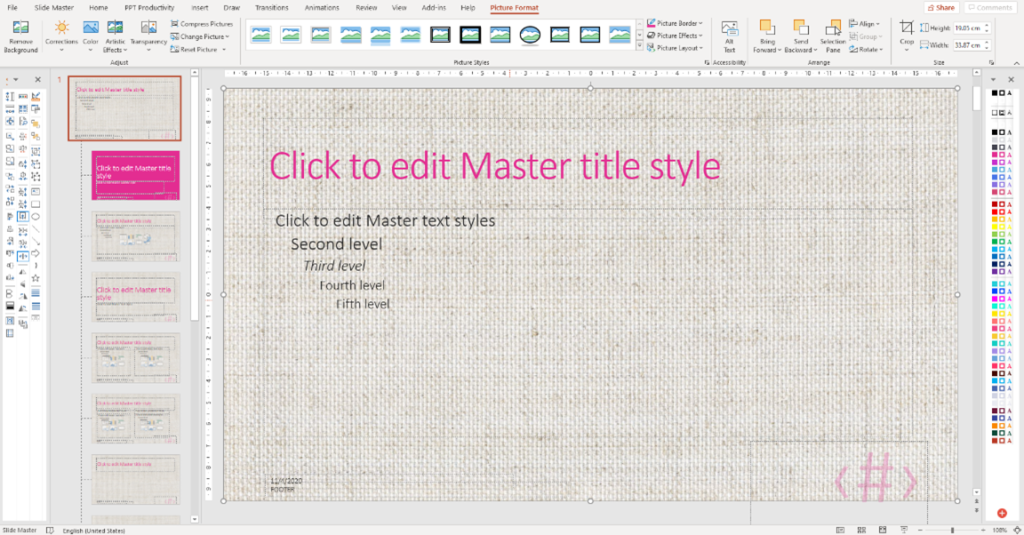
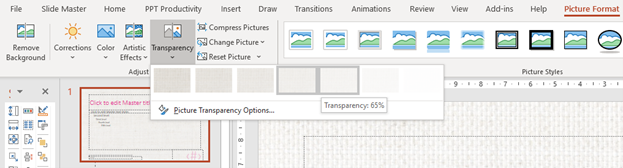
If you would like to make the background image less prominent (for example so your text or other elements on your slide standout more), adjusting transparency is a good option. On the ‘Picture Format’ tab click the ‘Transparency’ drop down, then select the desired transparency level. This will make the background image translucent.
You can personalize your PowerPoint template by adding some design elements.
First, decide what element/s you would like to add to all slides, and add these to the Parent Slide.
For this example, I want to add two lines to the left-hand side of my slide. The first will be thick, and the second line a lot thinner. I will use the ‘add connector’ function from my PPT Productivity Format Toolbar, but if you don't have PPT Productivity you can add a connector via the ‘Home’ tab or the ‘Insert’ tab. I will draw two lines from the top to the bottom of the slide. I will then use the increase line weight tool (from the PPT Productivity Format Toolbar) to make the first line thicker.
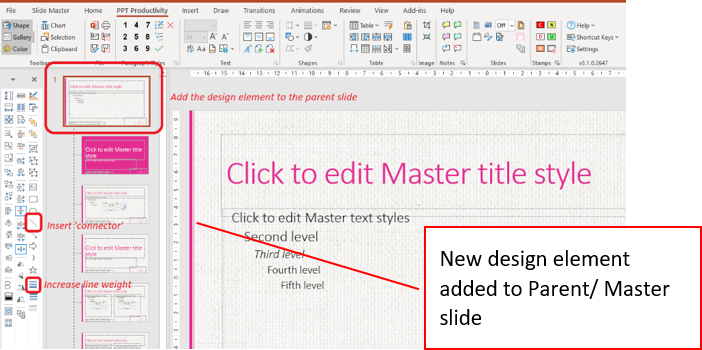
This design element will now appear on all Child Slides in the template because I have added it to the Parent master.
Once you have added the design elements to your Master/ Parent slide, you can adjust your slide guides. PowerPoint Slide guides help users to align content in their presentation and improve consistency of layout throughout presentations.
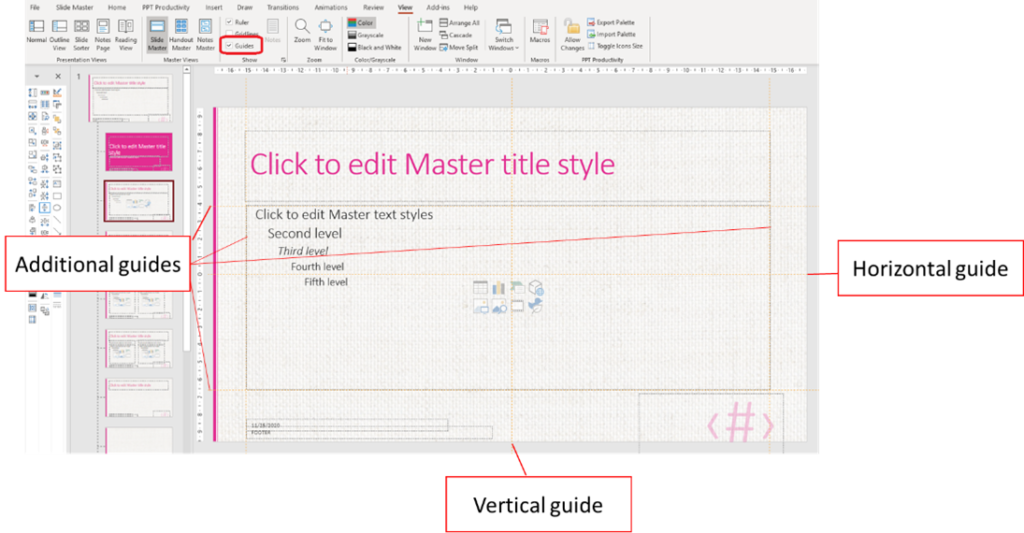
To edit your PowerPoint Slide Guides, click on the ‘View’ tab and select ‘Guides’. There are two guides: one vertical and one horizontal.
To move a guide, place your mouse over it. When your cursor becomes a double-headed arrow, drag the guide to where you want it on your slide. To add a new guide, simply start dragging an existing one, and then hit the Ctrl key on your keyboard before you let go.
Adding guides can help to let users know where they should be placing content on the PowerPoint slide, and where they shouldn’t.
Tip: to help optimize the position of content on your slide, you can also use the PPT Productivity No Fly Zone feature.
You can further customize your PowerPoint template by adding placeholders to the Slide Masters.
Placeholders denote a place for specific types of content. If you have chosen a preset Microsoft theme to base your template on, you will notice several placeholders including the slide title, content placeholders, slide footer, Date and Time and slide number have already been inserted for you. Otherwise, they will maintain the standard PowerPoint format.
It is important to keep pre-formatted placeholders (i.e Slide Title, Content, Footers etc) on the Parent Slide, even if you may not want to use all of these elements on each of your Child slides.
For your PowerPoint Template to function correctly it is important to add Placeholders to your Master Slide. This is because:
Now let’s update the format of our placeholders.
First, I want to change the size of my font of my Slide Title. Go to the Parent Slide and select the Slide Title Placeholder. From the top ribbon, either on the ‘Home’ or the ‘PPT Productivity’ tab, select the size you would like the title font to be.

I want to optimize the amount of space I have available for content on my slide, so I am adjusting the position and text alignment of my Slide Title.
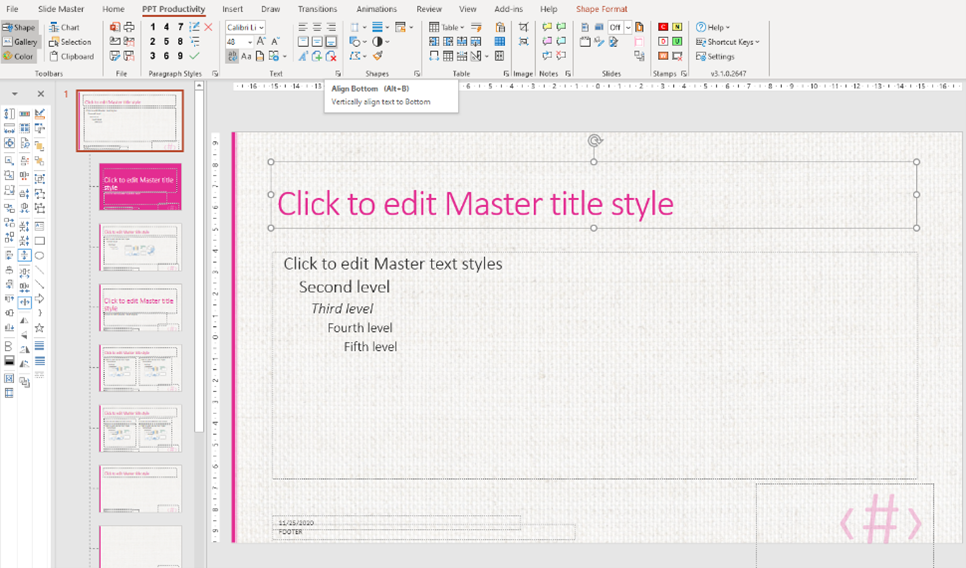
In the above image I have reduced the Slide Title vertically and aligned the text to the bottom on of the text box using my PPT Productivity Text Alignment Tools on the top ribbon (or you could use the text alignment functions on the ‘Home’ tab, but it’s an extra couple of clicks). Here you can also center your text if you prefer Slide Titles to be centered on your slide. I have kept mine left aligned for this example.
I also want to make some changes to my Text placeholder. It's important to get the right placement of the Text placeholder on the Parent Slide layout as it determines all the other content placeholders default positions on the slide.
To change the position of the Text placeholder in your PowerPoint template, select the Text placeholder and drag the placeholder to the top and left side - so that it is aligned with the Title placeholder. Using the sizing handles, adjust the size according to how you want the body text to look on your slides. At this point, it’s also a good idea to adjust your Slide Guides to match your Title and Text placeholders (if they have changed).
Let’s now focus on the text within the Text placeholder. You can change the font size of the different levels of text inside the Text placeholder.
To do so, select each level of text in the Text placeholder. From the font size dropdown on the top ribbon (either on the ‘Home’ or the ‘PPT Productivity’ tab), select the required font size. You may prefer to have all text the same size – in this case, select all levels and select the preferred font and size. Alternatively, select each line separately to adjust the font and size.
It's also a good idea to format your bullet point styles in the Text placeholder, even if you think you won’t use them. To change the default bullet formats, select all the text styles in the content placeholder.
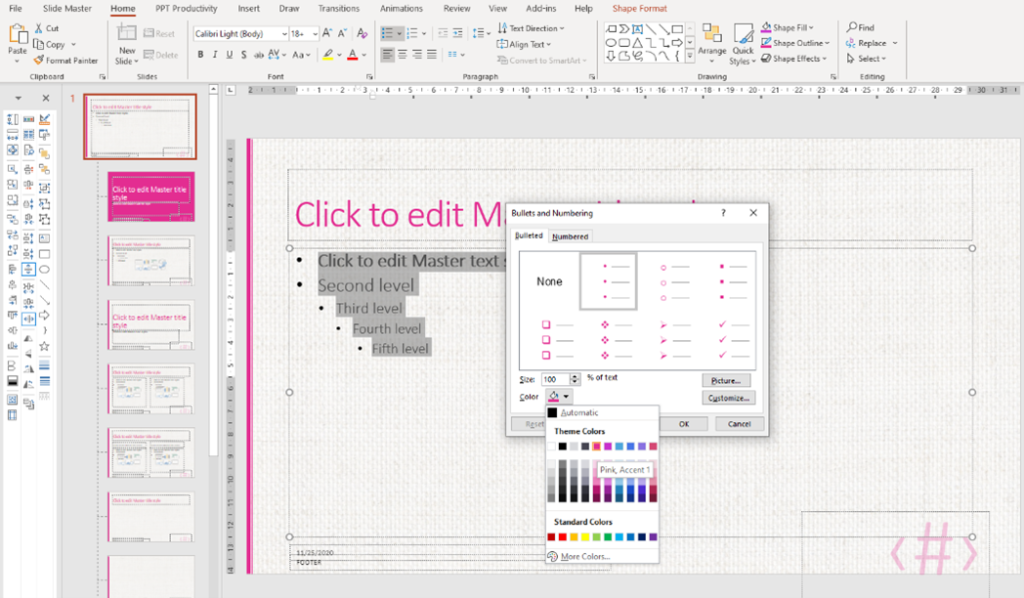
In the Paragraph group on the Home Ribbon, click the Bullets and Numbering dropdown, then select the style of bullet point you would like to use. I’m going to use solid circle bullet points in this example (refer to the screenshot below for guidance).

Now I am going to change the color of my bullet points to link better with my PowerPoint Template theme. To change the color of bullet points in PowerPoint, keep the text selected and in the same dropdown box as before, click on Bullets and Numbering at the bottom. Clicking the fill jug will reveal a selection of colors to match your template theme. Choose the required color, then click ok.
You can also adjust the indent of your bullet points. The bullet indents set on the Parent Slide will apply to all the following Child Slides. This keeps your bullet points and paragraph indents consistent throughout your presentation.
To adjust the bullets, first select the line you want to adjust, then drag the indent marker. Repeat this action for each level of text you wish to adjust.

Tip: To keep your bullets and paragraph styles consistent throughout your presentations, even when not using a content placeholders, save your paragraph styles using the PPT Productivity ‘Paragraph Styles’ function.
Once you have formatted the Text placeholder in your PowerPoint Template, you can move onto formatting the content placeholders at the footer of your slide.
The footer of your PowerPoint slide will generally contain placeholders for the Date and Time, the Footer, and Slide Number.
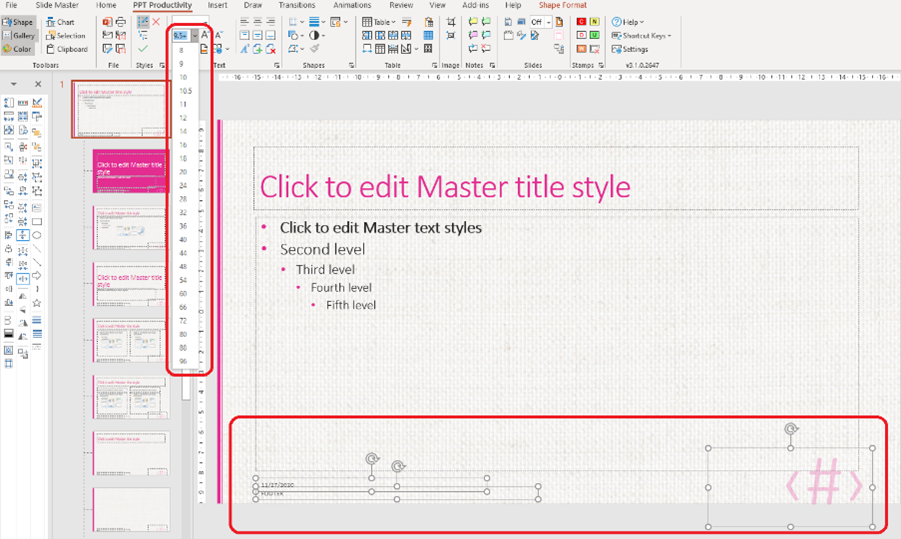
You can adjust the font size and position of each of the placeholders at the footer of the slide. In the Design theme I have chosen, the slide number is very large, so I will reduce the size of the text.
To adjust the text size for footer placeholders, simply select each placeholder, then from the top ribbon select the desired font size from the dropdown menu.
Now you need to set the format for your Date and Time placeholder.
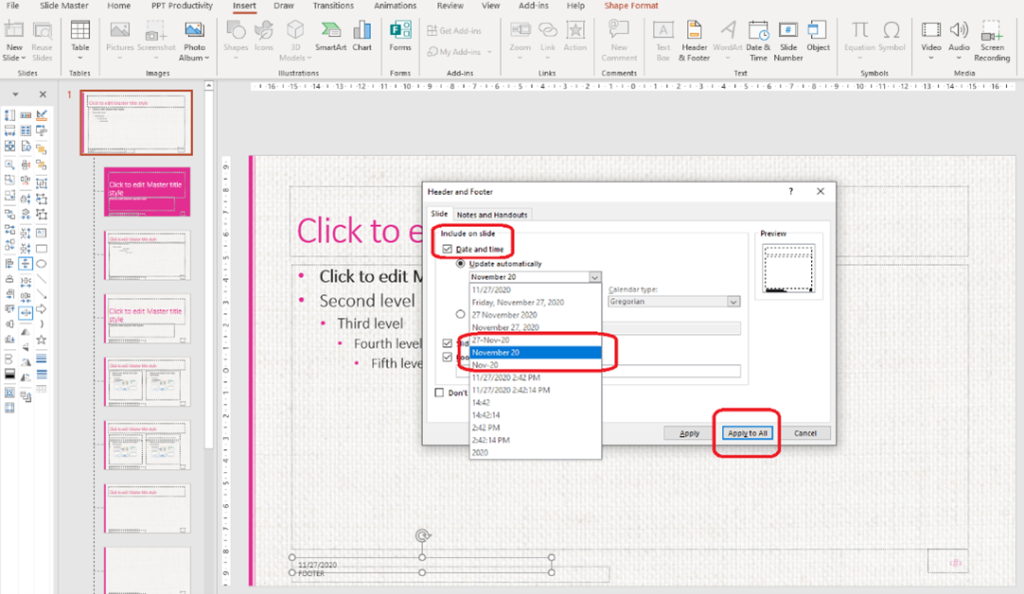
To format your Date and Time placeholder for your PowerPoint Template, select your Date and Time placeholder, go to the ‘Insert’ tab and click ‘Header and Footer’

This will open the ‘Header and Footer’ menu. Make sure the box next to Date and Time is checked. In the date dropdown, select how you would like the date/ date and time to be displayed at the bottom of the PowerPoint slide. Then click ‘Apply to All’
The Date and Time placeholder will automatically apply the changes. The Footer placeholder is designed to hold text. This could be the name of the company, the author, source material etc.
When you're happy with the font size of your footer placeholders, you can adjust their position on the slide. To adjust the position on the slide, simply select and drag the placeholder to the desired position, being careful to align it with the other placeholders on your slide. You can use your PPT Productivity alignment tools to quickly align the elements on the slide.
I’m happy with the position of my Footer placeholder under the Date and Time placeholder in this example, so I will leave it as is.
To add a logo to your PowerPoint Template Slide Master, select your Parent Slide then go to the ‘Insert’ tab, and navigate to where the logo image file is saved. This will typically be under ‘This Device’ in the drop-down menu.
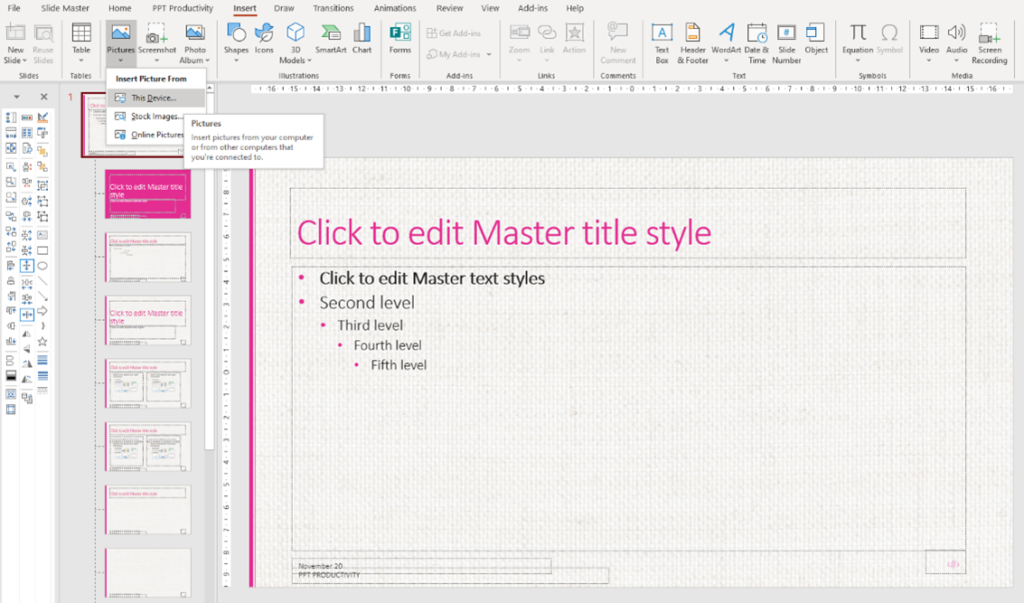
Select the image (tip: a .png file is better than a .jpeg file format to ensure the quality of the image remains intact), then click ‘Insert’.
Now you will need to adjust the position of the logo on the slide. Simply select the logo image and move to the desired location. You may also wish to resize the logo. You can simply drag from the corner from of the image to make the logo larger or smaller, or you can use the handy resize features from the PPT Productivity Format Toolbar.
I need my logo to be positioned exactly at the bottom middle of my slide, so I will use the PPT Productivity ‘align center’ function to make sure it is perfectly centered on my slide. You can alternatively use your slide guides to align the logo manually.

Now that your Parent Slide is completed, you can customize the Child Slide layouts for your PowerPoint template.
Child slide layouts inherit the formatting from the Parent Slide. However, they can be customized individually in PowerPoint's Slide Master view.
Let’s start by first customizing a few of the standard 11 Child Slides that are automatically generated by PowerPoint. That is, all 11 slides appearing beneath the Parent Slide in the thumbnails at the left-hand side of your PowerPoint presentation.
We will work on the Title Slide format first, as this is generally the most ‘different’ looking slide in comparison to the rest of the Child Slides.
While still in PowerPoint's Slide Master view, navigate to the Title Slide – the second slide in the document. This is the slide that you will typically use at the beginning of your presentation.
The ‘Title Slide’ for the Design theme I have chosen in this example is a solid pink slide.
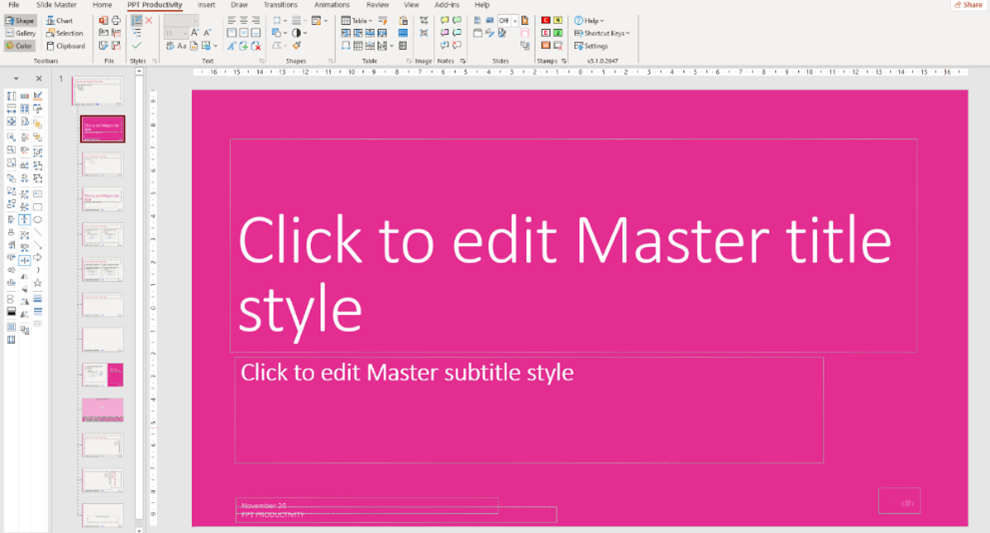
For our example I want to update the look of the Title text. To update the style of the Title text, select the Text box and make the desired changes. In this example I will update the font from Calibri Light to standard Calibri, plus make the font bold and center the text.

I also want to make the same style changes to the Subtitle text. This text box is not the same width as the Title text, so I will need to adjust the width first. I will use the ‘same width’ tool from the PPT Productivity Format Toolbar to achieve this. First select the Title Textbox, then the Subtitle Textbox, and click ‘same width’. My two textboxes are now exactly the same width (Alternatively you can manually adjust the textboxes to make them the same width).

I also want to ensure they are aligned correctly, also using the alignment features on the PPT Productivity Format Toolbar. This means when I center my text in the Subtitle textbox, it will be perfectly aligned with the text in the Title textbox.

You can see that the placeholders for my Footer, Date and Time and page number are also showing on the Title Slide. I don’t want these to be visible on the Title Slide, so I need to remove them.
To remove these placeholders from the Title Slide, go to the top ribbon on PowerPoint's Slide Master tab and deselect ‘Footers’.

All three of my Slide Footer placeholders have now been removed from the Title Slide (but they remain in position on the rest of the Child Slides).
When we initially set up this PowerPoint Template, we added a background image. This image will typically appear on all the Child Slide layouts. In the Design theme I have used for the example, a pink overlay was automatically added to the Title Slide. This means that the background image is not visible, but that is not always the case. You will often want to remove or hide the background image from one or more of the Child Slides in PowerPoint. There are two ways this can be achieved.
The easiest and probably the most effective way to remove any unwanted background images from a Child Slide in your PowerPoint template is by right mouse click on the specific Child slide, select ‘Format Background’.

The ‘Format Background’ Toolbar will open at the right-hand side of the PowerPoint presentation. Simply check the ‘Hide background graphics’ box and anything that has been added to your Parent/ Master slide that is not a placeholder will be hidden from view.

Another way to achieve the same result is by creating a solid shape to cover over the background.

Create a rectangle in a solid color, for example white, to cover the area where you wish to hide the background image/s. Once the area is covered, send the solid colored rectangle to the back - you could either use using PPT Productivity's ‘Send to back’ shortcut on the Format Toolbar, or by navigating to the ‘Home’ tab, clicking Arrange and selecting ‘Send to back’.

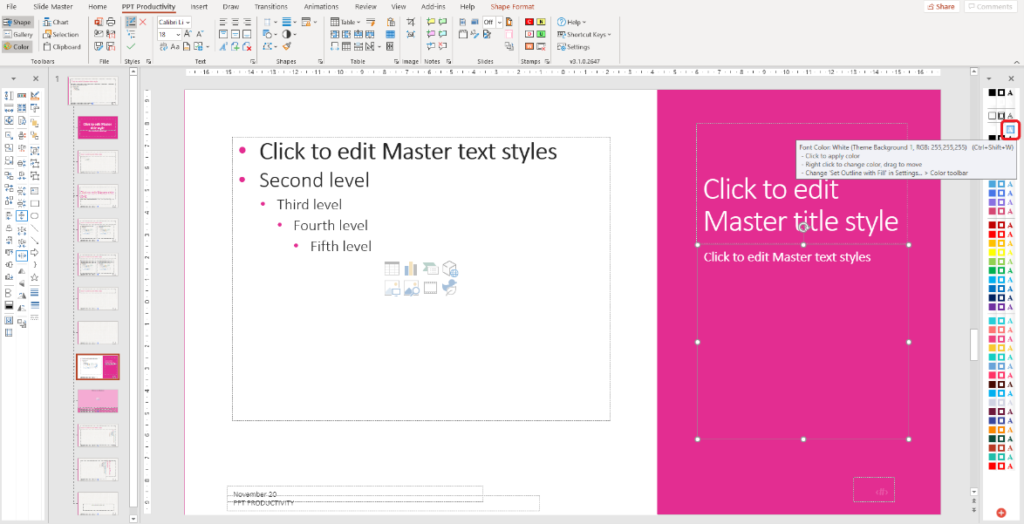
The background images added to the Parent slide are now hidden on this Child slide, and the placeholders have been placed in the foreground of the slide.
On this slide, I am also going to adjust the font color in the Text placeholders on the right-hand to white by selecting the text box and using the color palette on the PPT Productivity Color Toolbar.
You can add additional design elements and tweak the format of the Child Slides in your PowerPoint Template in the same way you did to the Parent Slide. However, any changes made to Child Slides will only appear on that specific layout and will not apply to any other slide in the PowerPoint Template. If you want a change or element to apply to all slides, remember to make the adjustment to the Parent Slide.
In addition to customizing the standard 11 Child slides created by default by PowerPoint, you can also create your own PowerPoint layouts.
We only recommend creating new Child layouts if it is a layout you will use frequently. It’s a good idea not to create an excessive amount of additional Child layouts, as this tends to create confusion for other template users and it increases the file size of your template (which in turn increases the file size of every presentation you create). If you have a large number of slide layouts you plan to use infrequently, you might want to check out the PPT Productivity Slide Library.
To create a new Child slide for your PowerPoint Template, click ‘Insert layout’ on the Slide Master tab. A new Child slide will be added at the end of the pack, with the slide title and any footer placeholders.
You can now add any additional place holders required. For this example, I’m going to create a team slide (e.g About the Team). For that I will need to add some image and text placeholders.
Add the placeholders the same way you did for the other slides. On the Master Slide tab, select the placeholder from the ‘Insert Placeholder’ drop down menu.

Tip: by adding the ‘Content’ placeholder, you allow for any type of content to be added to the slide. If your intent is only to allow a certain type of content, e.g., picture, table, chart etc to be added to a specific slide layout, then specify which one in the ‘Insert Placeholder’ dropdown. If the type of content is less important, but you want to ensure the layout is correct, then specify the ‘Content’ from the dropdown menu.
Click the placeholder you want to use, then drag your cursor to draw the placement and size of the place holder on your slide.
On my new ‘Team’ Child slide, I have added 3 picture placeholders and aligned 3 text placeholders below.

To help those using this PowerPoint template to know what this slide is intended for, you can update the text in the placeholders to describe what is required. You can also change the shape and other properties of the layout including the outline, the fill and other effects.

In the example above I have added text instructions, colored the border, and added a shadow to the placeholder. I have also centered the text in the text boxes.
Once you have finished updating your new custom PowerPoint Child slide layout, you can rename it. This also makes it easier for other users of the template to easily find the right layouts.
To rename your custom Child slide layout, right click on the custom child layout thumbnail on the left-hand side and select ‘Rename Layout’.
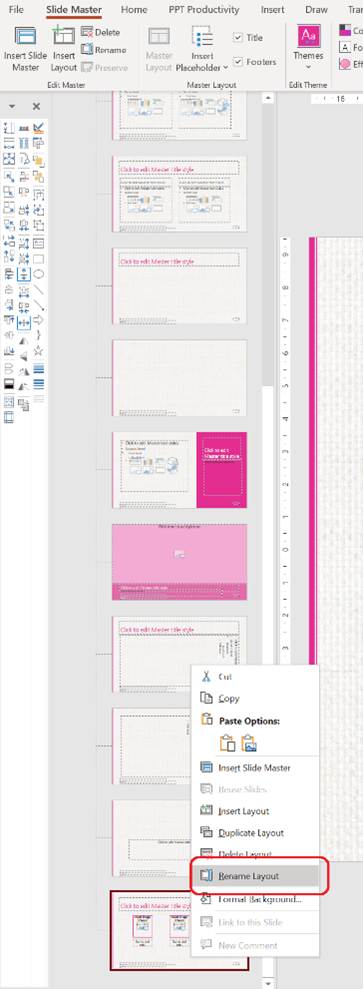
The ‘Rename Layout’ box will appear. Type in the title you want your new custom Child layout to have.
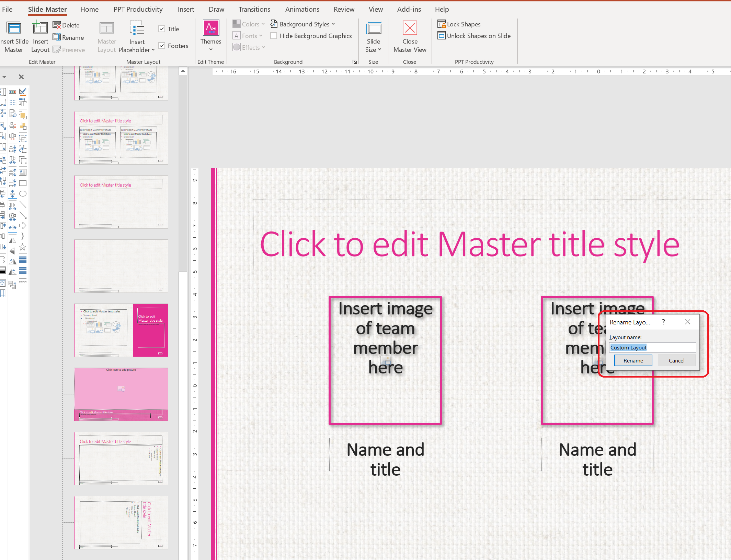
I have called my new custom PowerPoint layout Team Slide. Renaming the custom layout makes it easier for users of the template to know what the purpose of the layout is. It is now easily identifiable from the ‘Insert Slide’ drop down, as you can see in the example below.

PowerPoint Slide layouts are also accessible by right mouse click on any slide in a presentation and selecting ‘Layout’.

Once you're happy with the theme style, colors, font, and layout of your Custom template, close the Slide Master. You can now review to see how your custom layout will look as a finished presentation!
Critical final step: to use your new template as a template, you need to save it in the correct format. PowerPoint templates are often called 'Pot Files' because they file extension is .POTX.
To save your PowerPoint template in the POTX format, click File, Save As. Enter your template name and click on the ‘Save as type’ dropdown menu at the bottom of the dialogue box. Scroll down and select PowerPoint Template (*.potx) before clicking save.

You template is now ready to use!
To find your template again, from within PowerPoint click the ‘File’ tab and select the ‘New’ button, and flick to the ‘Personal’ tab. You will now see a preview of your custom template.
Clicking it will open a new blank presentation based on your custom template. If you're a PPT Productivity user, you can pin your new template to the top of your list or set it as your default template. To do this use the Template Management features, located on the top ribbon of the PPT Productivity tab.

Before you start using your PowerPoint template or sending it to others in your team/ organization to use, it’s a good idea to test it, to make sure it functions correctly.
So, go ahead and play with it. Test each layout – make sure it looks right. Delete placeholders and re-insert the same slide to your deck and make sure they appear again. Add images to designated placeholders. Add slides from other PowerPoint templates to see how that impacts your template. Print a presentation that uses the template. Basically, make sure it is going to work in the real world. If you find something does not look quite as you intended, go back into the Master Slide view, make any needed adjustments, and save your edits.
If you need to make any changes once you have saved your templates, you need to open your template for editing. Opening a PowerPoint template to edit is different to how you would usually open a PowerPoint files This is because when you double click a .POTX file, it opens an instance of the file as a blank presentation ready to use (it will open a .pptx instance of the tile).
To open a PowerPoint template to edit, simply find the file in your Windows Explorer view, right click and select open. This will open the .potx file. Once you have made your changes, simply click save and close the .potx file.
We hope the information in this post has been useful. If you have any other PowerPoint questions, please feel free to reach out to our team.

Start your 30 day free trial - Microsoft Office for Windows
Start Free Trial
