

Hoe alle lettertypen in PowerPoint te wijzigen: Stapsgewijze handleiding
Proberen uit te zoeken hoe je alle lettertypen in PowerPoint kunt wijzigen? Problemen met...
 Courtney
Als je in marketing werkt en je bedrijf net een rebranding heeft ondergaan of een overname heeft voltooid, weet je al wat er daarna komt. Tientallen (soms honderden!) PowerPoint-presentaties, die allemaal moeten worden bijgewerkt naar het nieuwe merk. Nieuwe lettertypen. Nieuwe kleuren. Nieuwe logo's. Nieuwe sjablonen. En een deadline die gisteren al was.
Het rebranden van PowerPoint-presentaties is een van de meest tijdrovende en foutgevoelige taken in de toolkit van een marketingteam. Je werkt niet alleen één presentatie bij. Je zoekt naar oude merk kleuren die diep in grafieken begraven liggen, vervangt logo's die direct op dia's zijn geplakt in plaats van in de Slide Master te plaatsen, en corrigeert lettertypen die handmatig zijn overschreven in individuele tekstvakken, dia voor dia.
Deze gids behandelt precies hoe je het moet doen - inclusief wat standaard PowerPoint je biedt, waar het tekortschiet, en hoe de tools van PPT Productivity de tekortkomingen opvangen. Of je nu hier bent omdat je op zoek bent naar een stapsgewijs proces, of omdat je de handmatige aanpak al hebt geprobeerd en een snellere manier nodig hebt, je bent op de juiste plek.
PPT Productivity is een tijdbesparende PowerPoint-add-in, met meer dan 200 functies om je tijd te besparen. Als je PPT Productivity nog niet hebt geprobeerd - download een gratis proefversie van 30 dagen om alle hier beschreven functies te testen. Geen creditcard vereist.
Voordat we ingaan op de hoe, is het de moeite waard om onderscheid te maken tussen twee dingen die vaak worden verward.
Het eerste is het bouwen van een nieuw PowerPoint-sjabloon vanaf nul als onderdeel van een rebranding - het instellen van de Slide Master met nieuwe kleuren, nieuwe lettertypen, nieuwe lay-outs en een nieuw logo. Dat is meestal een ontwerptaak die één keer gebeurt, meestal met hulp van je merkteam of een ontwerpbureau.
Het tweede - en waar dit artikel zich op richt - is de operationele uitdaging die volgt: het nemen van je bestaande bibliotheek van presentaties en deze bijwerken naar het nieuwe sjabloon. Dit is wat op het bord van het marketingteam terechtkomt nadat het sjabloon is gebouwd, en het is waar de meeste pijn optreedt.
De moeilijkheid is dat PowerPoint-bestanden merkelementen op veel verschillende plaatsen verzamelen:
Gewoon een nieuw thema toepassen via het tabblad Ontwerp - de aanpak die de meeste "hoe verander je PowerPoint-sjabloon" gidsen je zullen vertellen te volgen - lost geen van deze problemen op. De themawijziging werkt de master bij, maar elk element dat handmatig is overschreven blijft precies zoals het was. Wat lijkt op een snelle oplossing verandert in een dia-voor-dia schoonmaak.
Dit is precies waar PPT Productivity de dag redt.
Voordat je een enkele presentatie opent, verzamel alles wat je nodig hebt in één map:
Als je deze bij de hand hebt voordat je begint, betekent dit dat je halverwege een presentatie niet hoeft te stoppen om een HEX-code op te zoeken of het juiste logobestand op te graven.
De eerste taak is ervoor te zorgen dat je nieuwe merk sjabloon correct is ingesteld en toegankelijk is voor iedereen in het team. Dit is de basis waarop alles anders wordt gebouwd (Sla over als dit al is gedaan).
Standaard PowerPoint slaat sjablonen op in verschillende standaardlocaties, afhankelijk van hoe ze zijn geïnstalleerd, of ze van IT kwamen of handmatig zijn opgeslagen, en of ze op een lokale machine of een netwerkstation staan. Het vinden van het juiste sjabloon en ervoor zorgen dat het degene is die opent wanneer iemand een nieuwe presentatie maakt, is vaak moeilijker dan het klinkt.
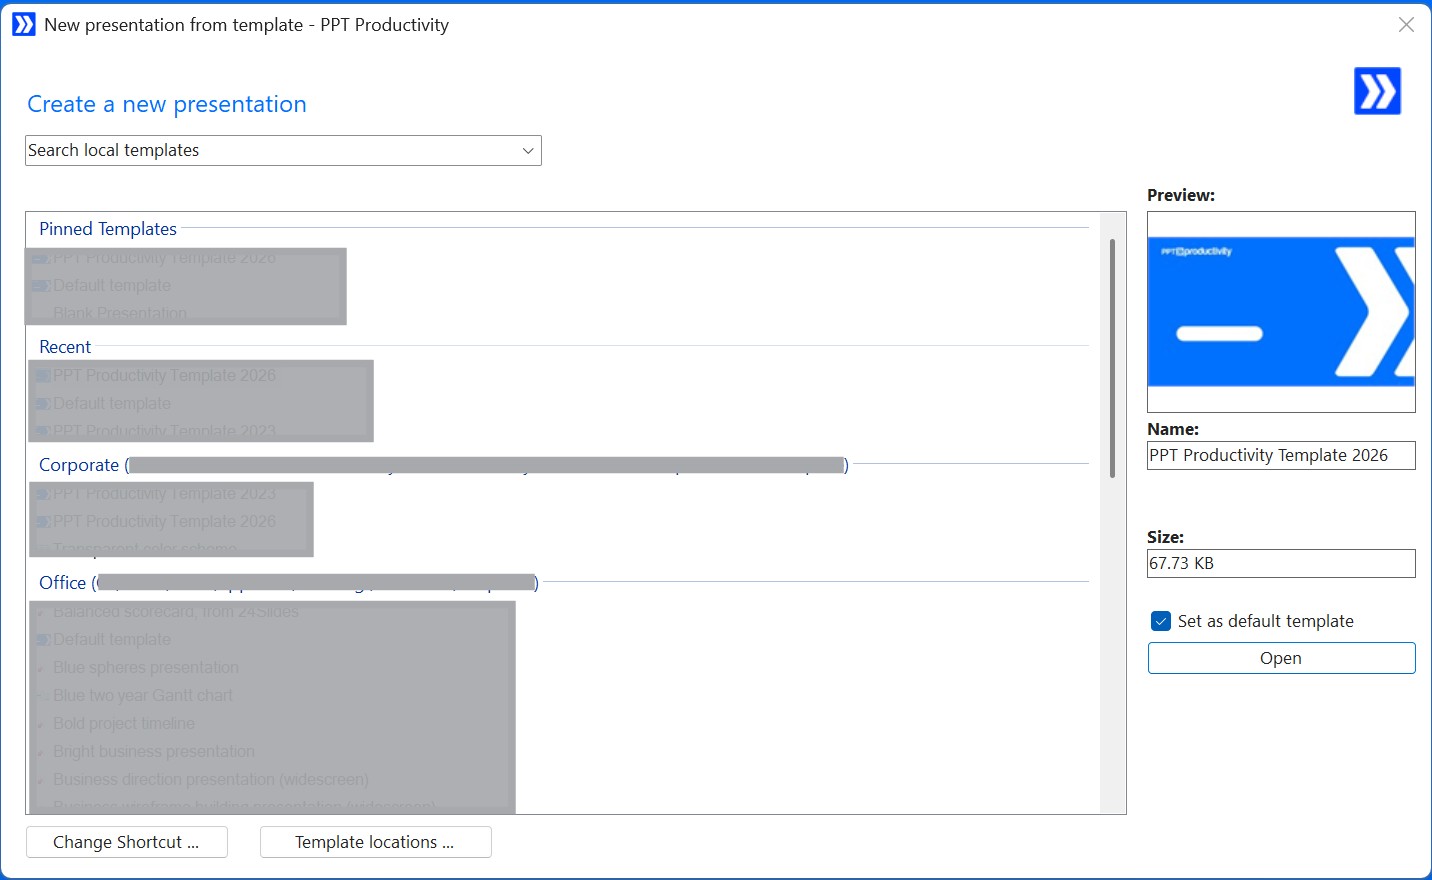
PPT Productivity's Template Manager geeft je één plek om al je PowerPoint-sjablonen te bekijken, vast te pinnen en te openen - ongeacht waar ze zijn opgeslagen op je laptop, netwerkstation of gedeelde map. Vanuit het Template Manager-venster kun je je nieuwe merk sjabloon met één klik als standaard instellen. Vanaf dat moment opent elke nieuwe presentatie automatisch met het juiste sjabloon.
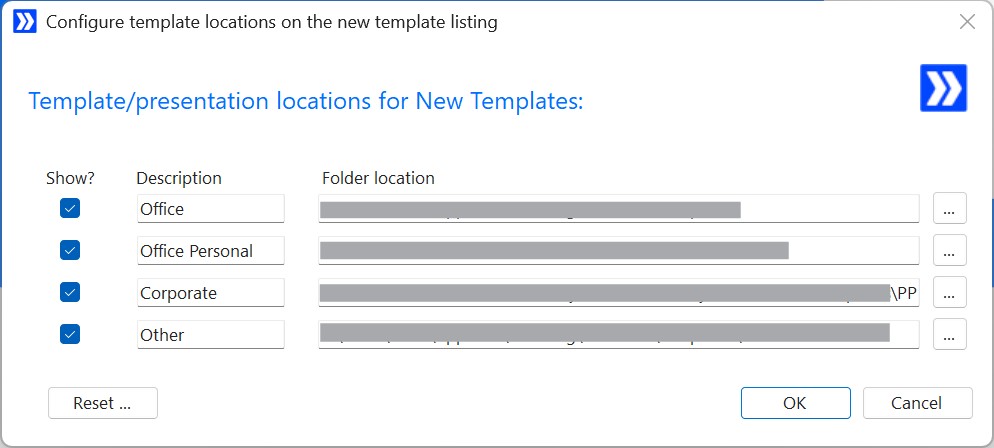
Voor teams die meerdere sjablonen beheren - bijvoorbeeld verschillende sjablonen voor verschillende markten of bedrijfseenheden - kun je je meest gebruikte sjablonen bovenaan de lijst vastpinnen en je standaard sjabloon wijzigen wanneer dat nodig is.
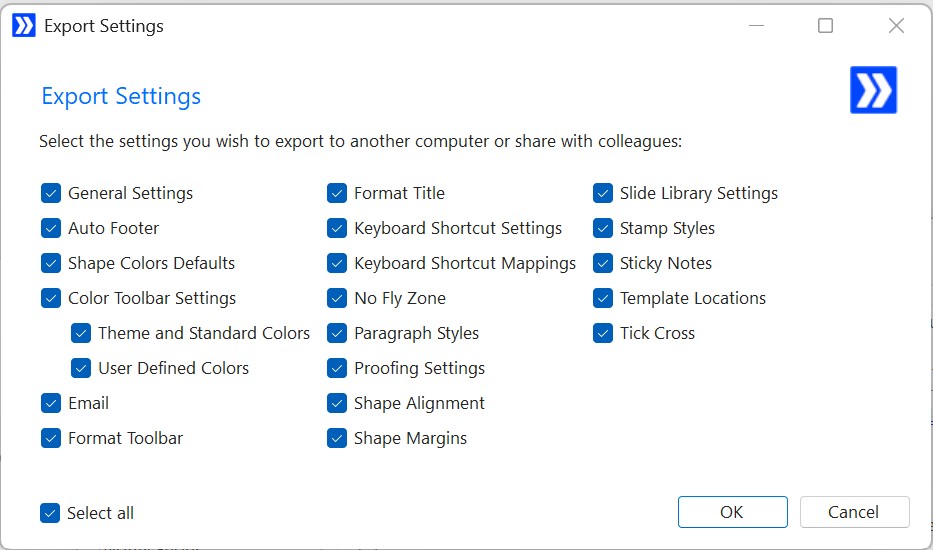
Productiviteitstip: Zodra je nieuwe merk sjabloon als standaard is ingesteld, gebruik je PPT Productivity's Share Custom Settings functie om je instellingen als een bestand te exporteren en te delen met je team. Collega's kunnen het importeren zonder enige IT-ondersteuning - zodat iedereen vanaf dag één vanuit dezelfde setup werkt.
Lettertypen zijn meestal het meest zichtbare signaal van een rebranding. Als je oude merk bijvoorbeeld Calibri gebruikte en je nieuwe merk Nunito gebruikt, moet elke instantie van Calibri verdwijnen - in bodytekst, dia titels, tabelcellen, voetnoten, tekstvakken en in de Slide Master zelf.
Standaard PowerPoint's native Replace Fonts is frustrerend beperkt. Het behandelt één lettertype tegelijk, het raakt de Slide Master niet aan, en het geeft je geen controle over lettergrootten. Wanneer een nieuw lettertype iets groter of kleiner wordt weergegeven dan het oude bij dezelfde puntgrootte, kunnen je lay-outs breken - en er is niets dat de native tool kan doen om dat te voorkomen.
PPT Productivity's Replace Fonts functie is een aanzienlijke upgrade. Hier is wat het kan doen dat standaard PowerPoint niet kan:
De Replace Fonts Advanced mode voegt een bijzonder nuttige optie toe genaamd "Inherit from Slide Master". Deze functie werkt de presentatie bij om de lettertypen te gebruiken die zijn gedefinieerd in je huidige Slide Master, in plaats van dat je elk vervangend lettertype handmatig moet specificeren. Wanneer het nieuwe merk sjabloon al correct is ingesteld, kun je hiermee alle dia-inhoud in lijn brengen met één enkele actie.
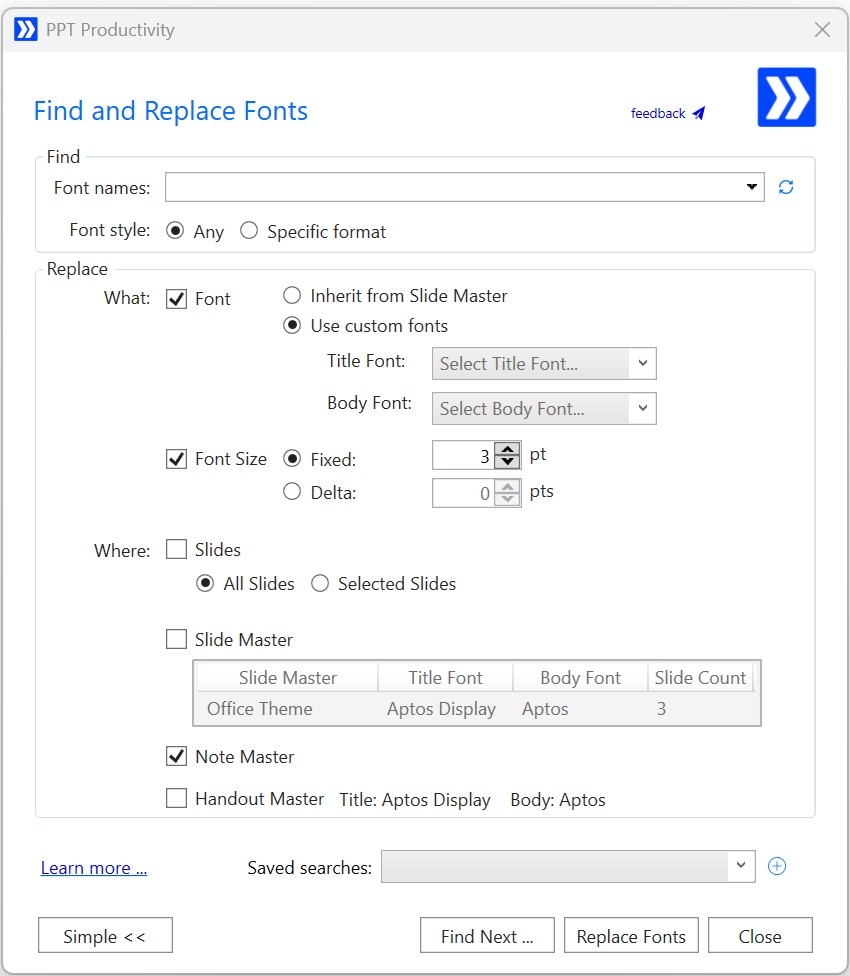
De Find Fonts functie laat je elke lettertype zien die momenteel in de presentatie wordt gebruikt in een enkele lijst voordat je begint.
Het correct krijgen van kleuren is vaak het meest nauwgezette deel van een PowerPoint-rebranding. Oude merk kleuren hebben de neiging om direct in vormen, tekst, randen en grafiekelementen te worden gecodeerd door RGB-waarde (in plaats van gekoppeld aan het themapalet). Er is geen native PowerPoint-tool om alle instanties van een specifieke oude RGB-kleur in een presentatie te vinden en te vervangen.
PPT Productivity's Kleurenpalet Werkbalk maakt het veel sneller om de juiste merk kleuren toe te passen terwijl je door een presentatie werkt. De werkbalk laadt dynamisch de themakleuren van het sjabloon van je open presentatie, dus op het moment dat je een PowerPoint-presentatie opent met het nieuwe merk sjabloon, staan de juiste kleuren direct in de werkbalk.
Een paar dingen die dit bijzonder nuttig maken voor rebranding werk:
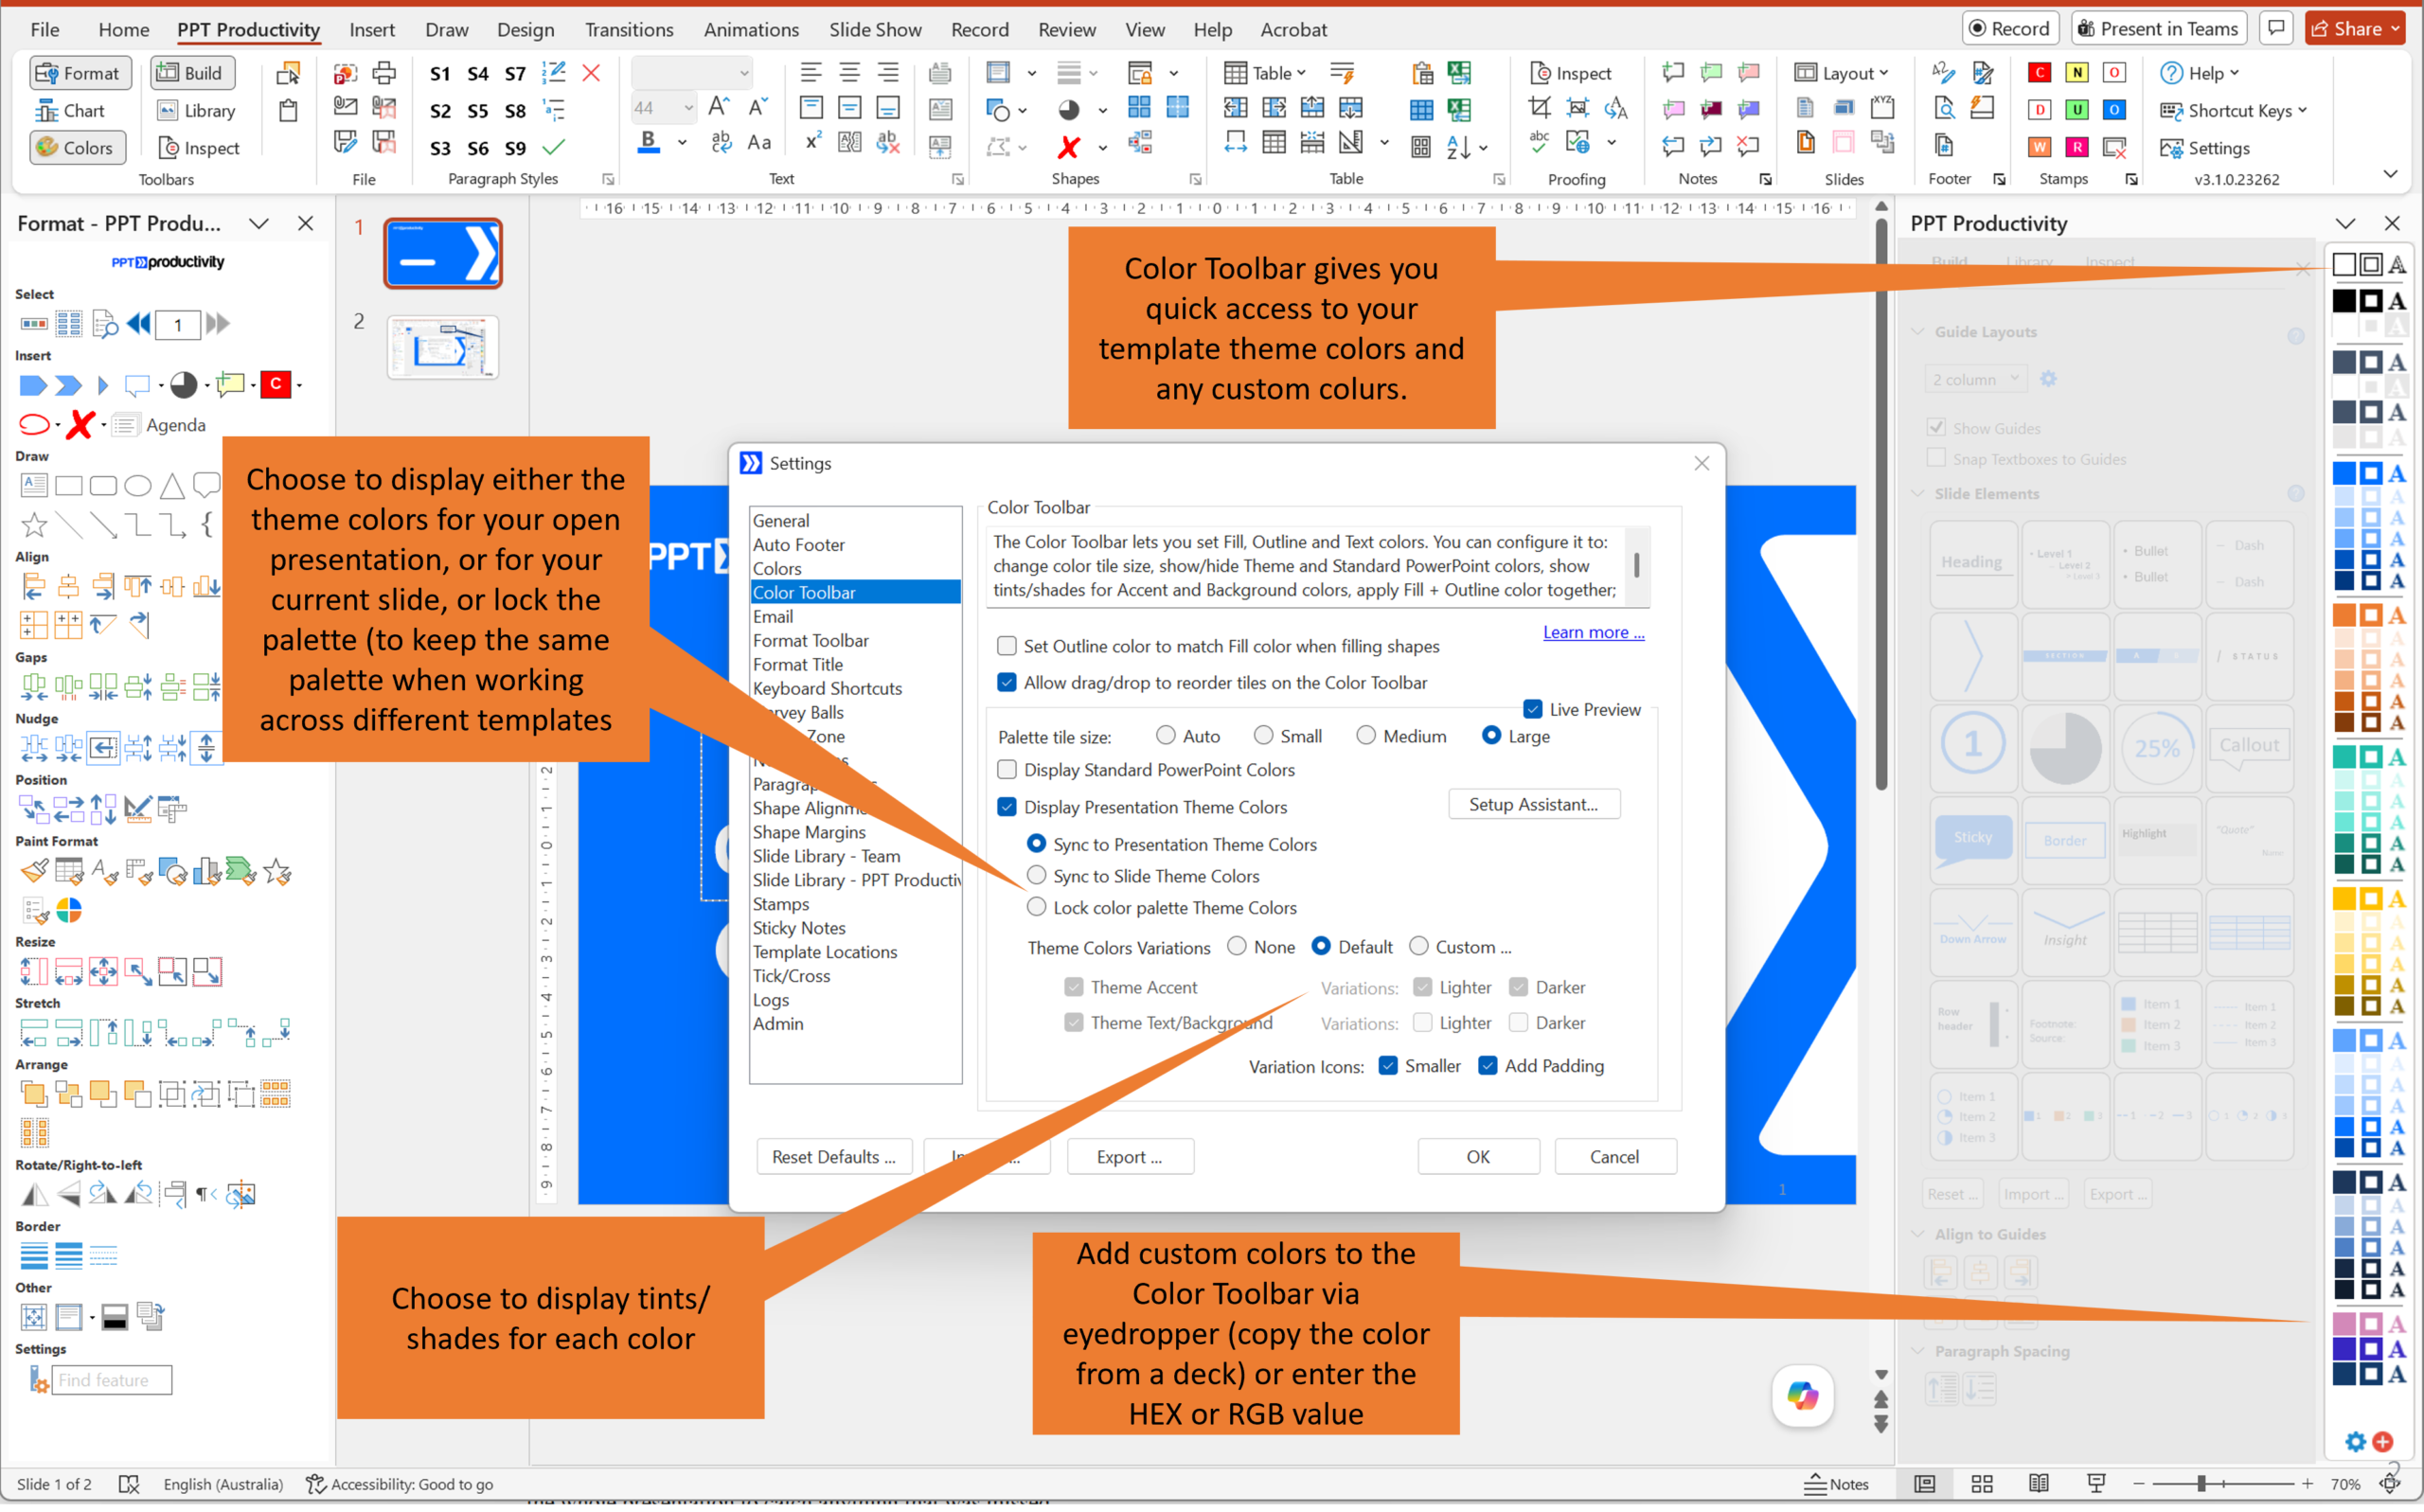
Zodra je je Kleuren Werkbalk voor het nieuwe merk hebt ingesteld, gebruik je de Share Color Palette functie om je kleurinstellingen te exporteren en te delen met het team. Iedereen krijgt hetzelfde palet in hun werkbalk, zonder het handmatig te hoeven configureren.
Voor het vinden en vervangen van specifieke oude merk kleuren op grote schaal, is de Fix Colors functie in Proofing Tools de tool om te gebruiken. Het scant je hele presentatie, identificeert elke gebruikte kleur (door RGB-code), en markeert alle kleuren die geen deel uitmaken van het palet van je nieuwe sjabloon. Je kunt die off-brand kleuren selecteren en vervangen door de juiste merk kleur.
Dit is vooral handig voor het vangen van kleuren die gemakkelijk te missen zijn - bijvoorbeeld een iets verkeerde tint blauw in een rand, of een oude merk accentkleur die een collega maanden geleden hard gecodeerd heeft in een diagram.
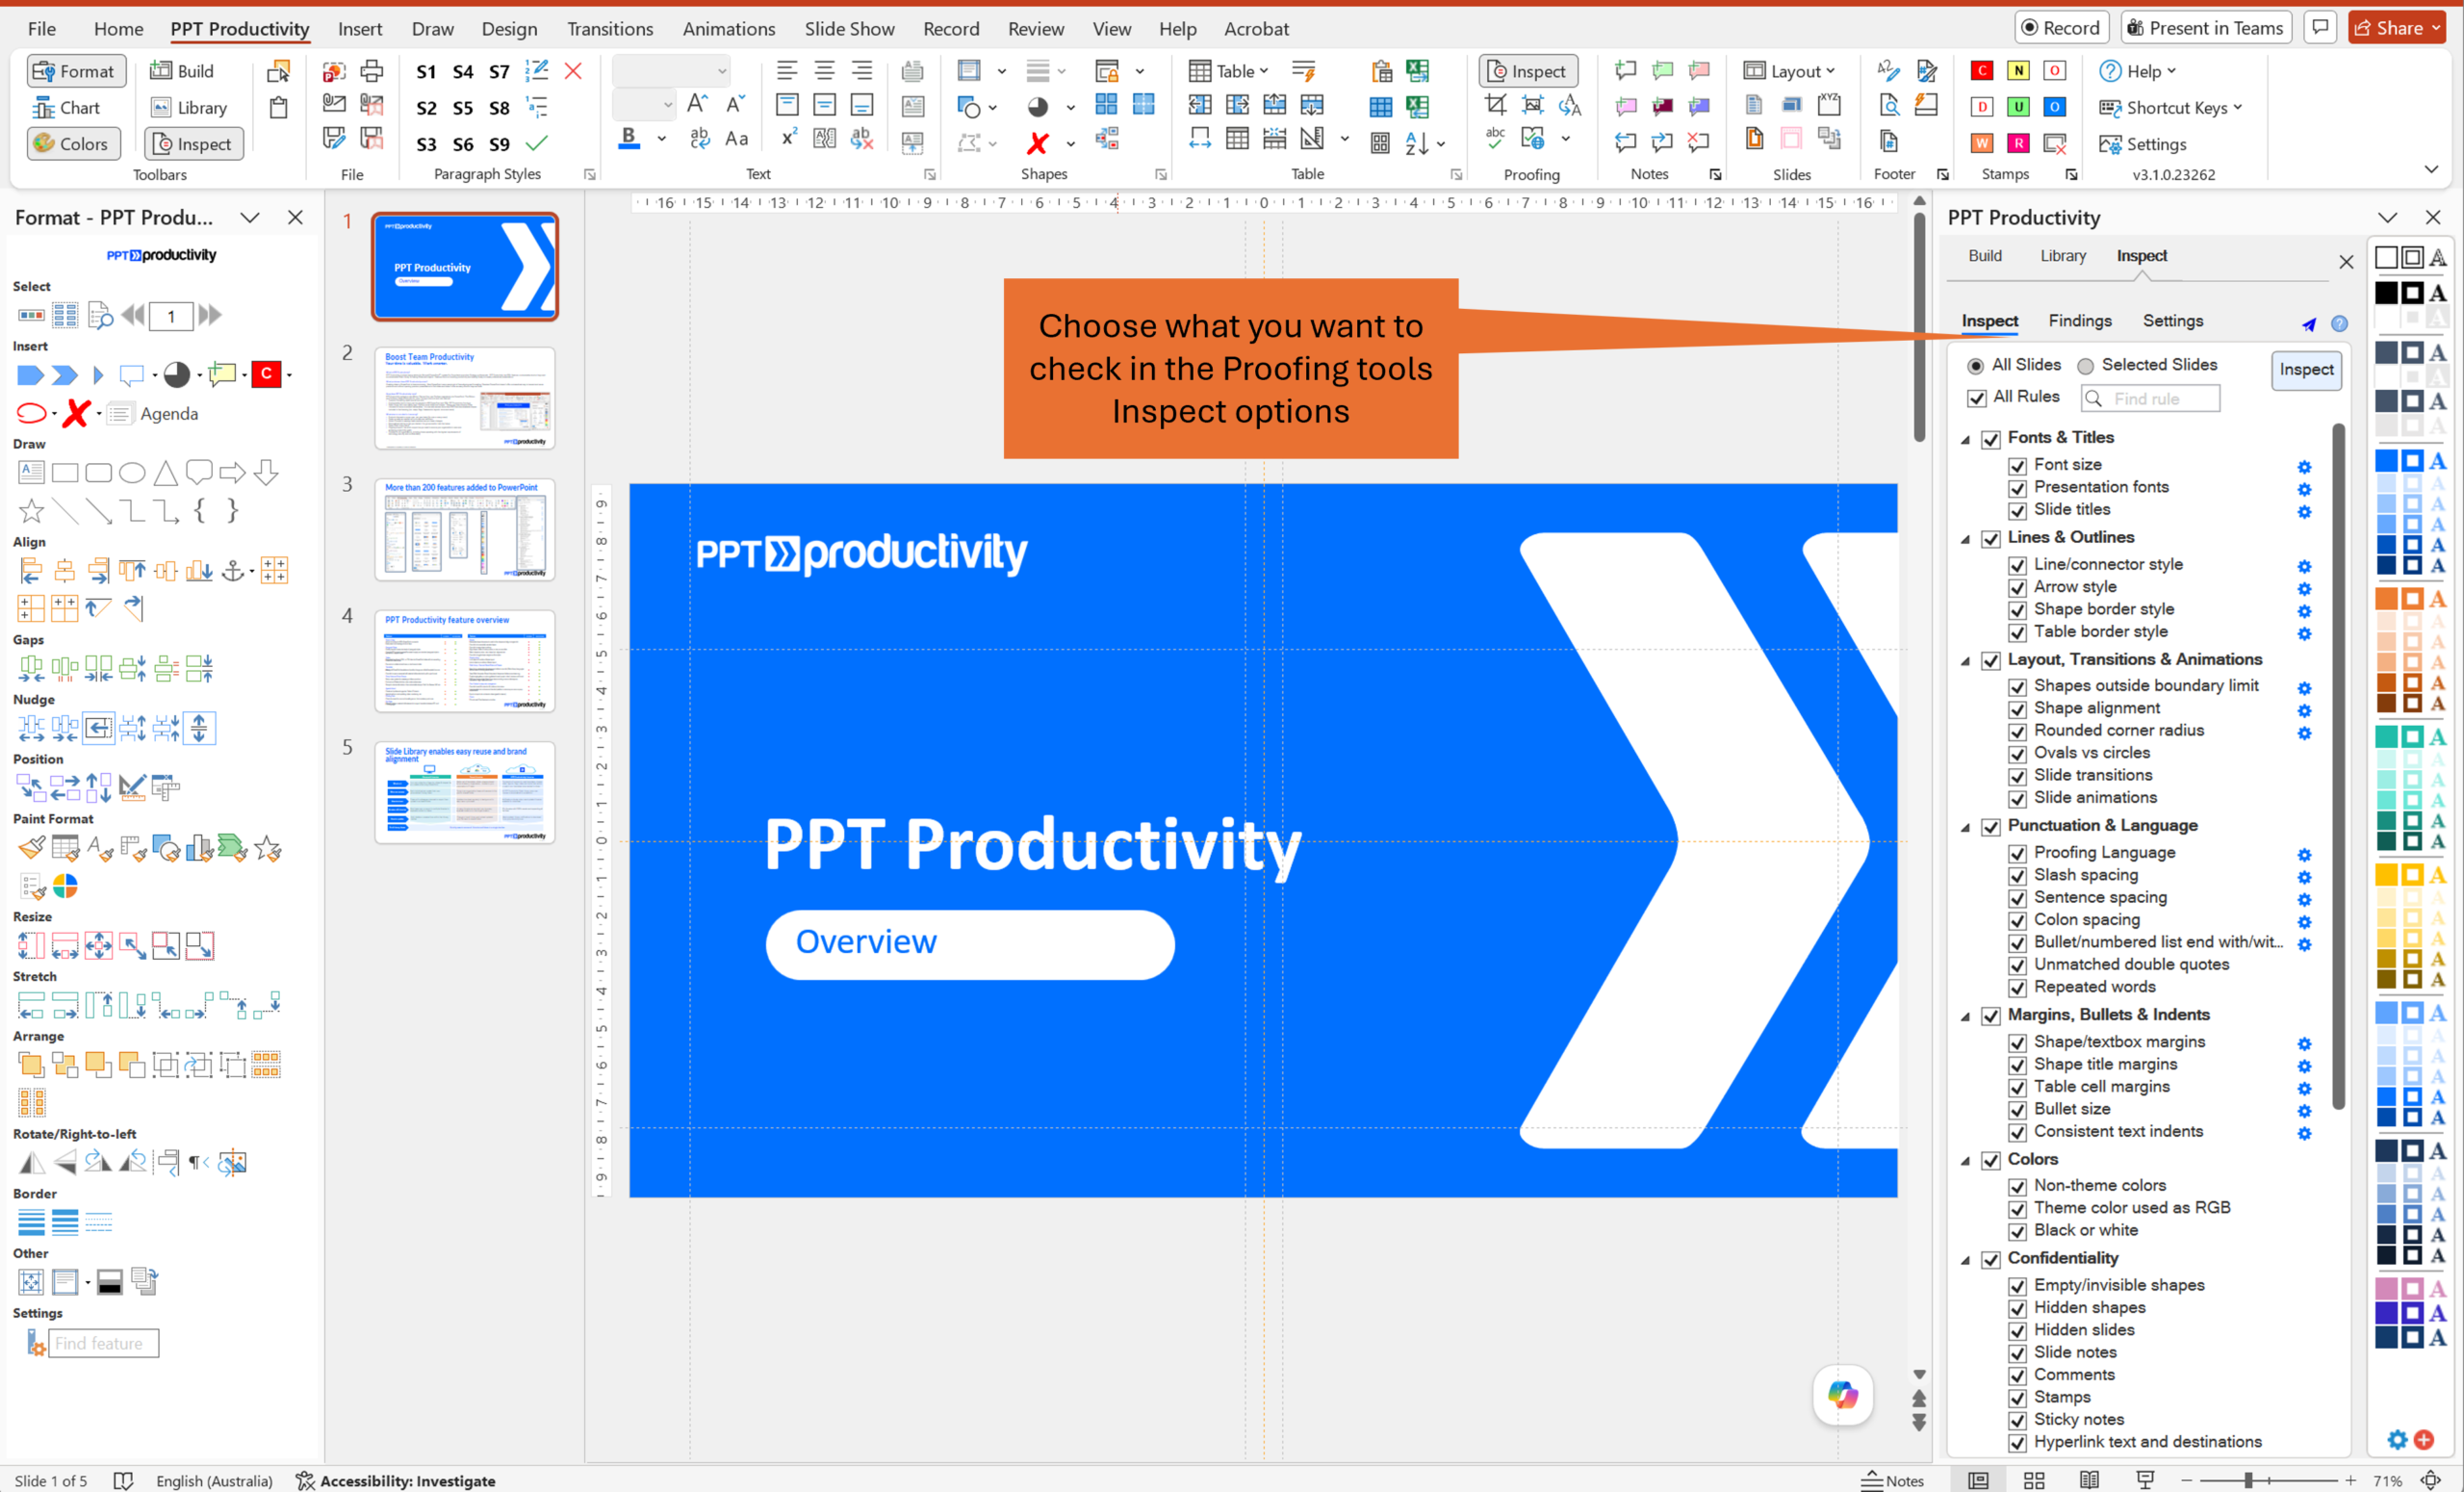
Zodra je de bulk lettertype- en kleurvervanging hebt gedaan, laten PPT Productivity's Proofing Tools je een uitgebreide scan uitvoeren over de hele presentatie om alles te vangen wat gemist is.
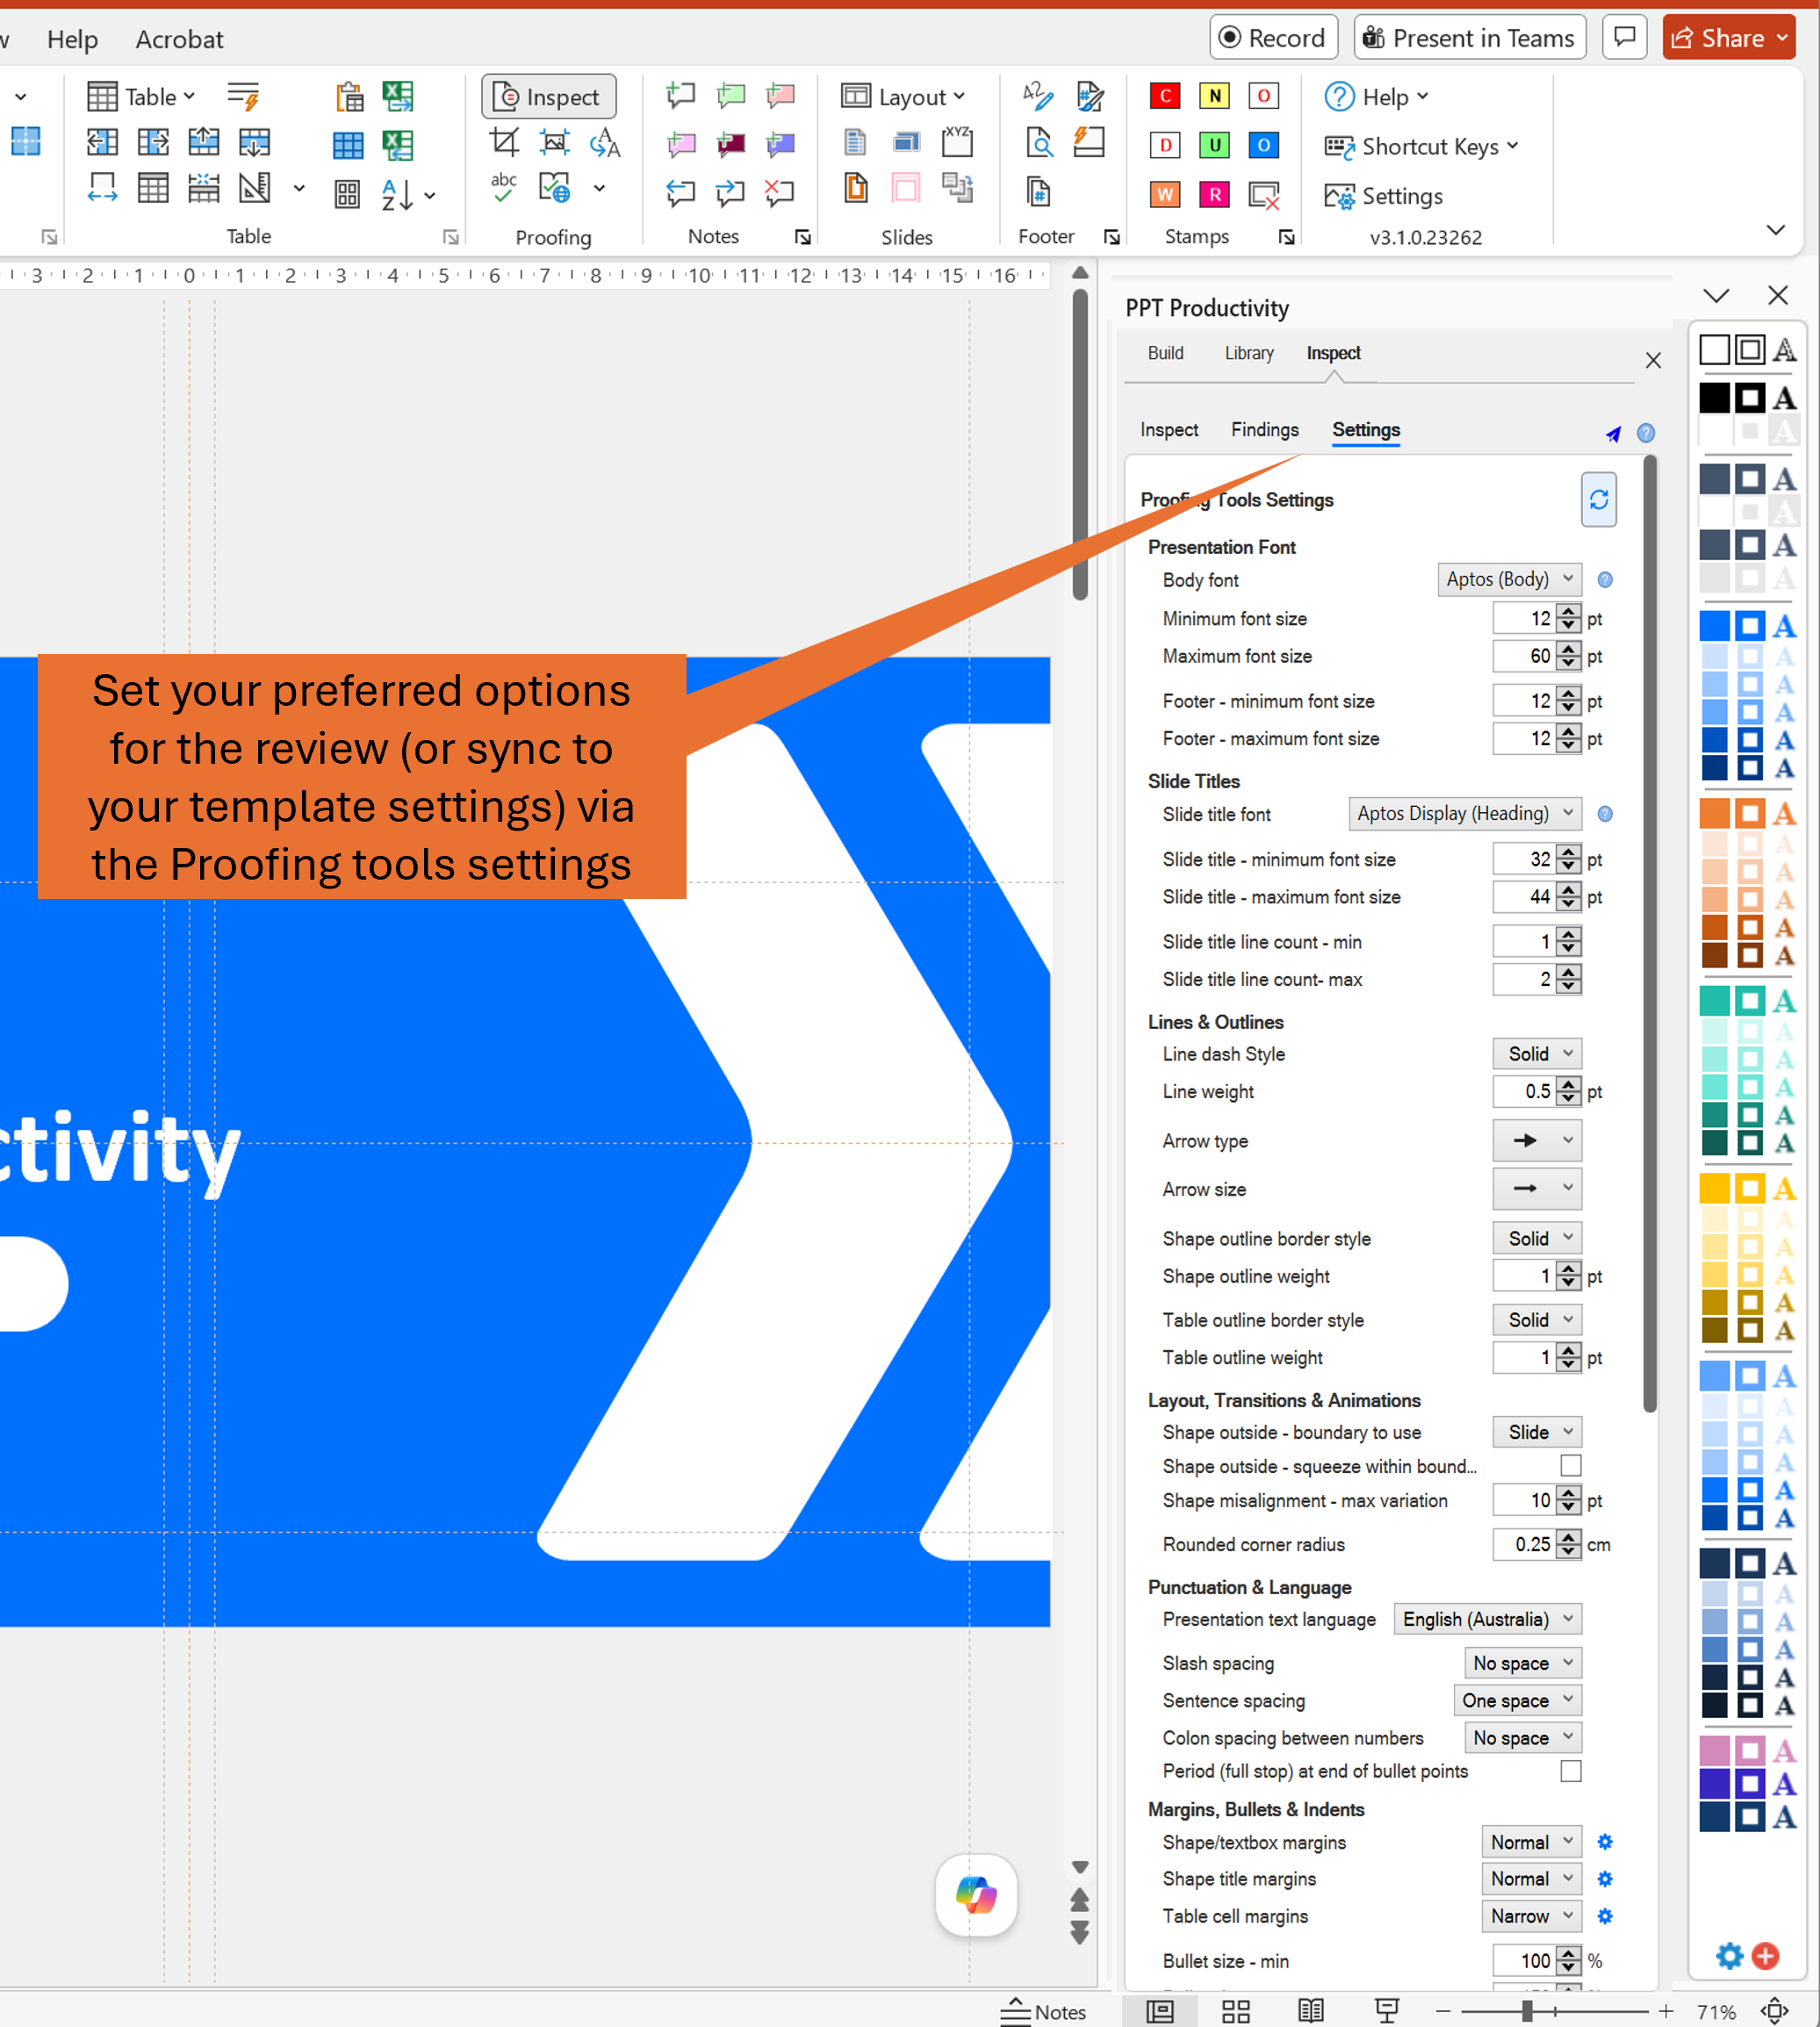
De Sync Template Settings optie is de plek om hier te beginnen. In plaats van handmatig alle Proofing Tools voorkeuren te configureren om aan je nieuwe merk standaarden te voldoen, open je gewoon een presentatie met het nieuwe merk sjabloon en klik je op Sync Template. Proofing Tools kan de lettertype-, kleur- en marge-instellingen van het sjabloon identificeren en de checker automatisch configureren.
Voor rebranding doeleinden denken we dat de meest nuttige controles zijn:
Voor elk item dat de Proofing Tools identificeert, kun je ervoor kiezen om alle instanties automatisch te corrigeren, elk afzonderlijk te beoordelen of het te negeren. De beoordelingsmodus is handig wanneer je niet zeker weet of een instantie moet worden gewijzigd - bijvoorbeeld een specifiek lettertype dat opzettelijk is gebruikt voor een klantquote of een screenshot bijschrift.
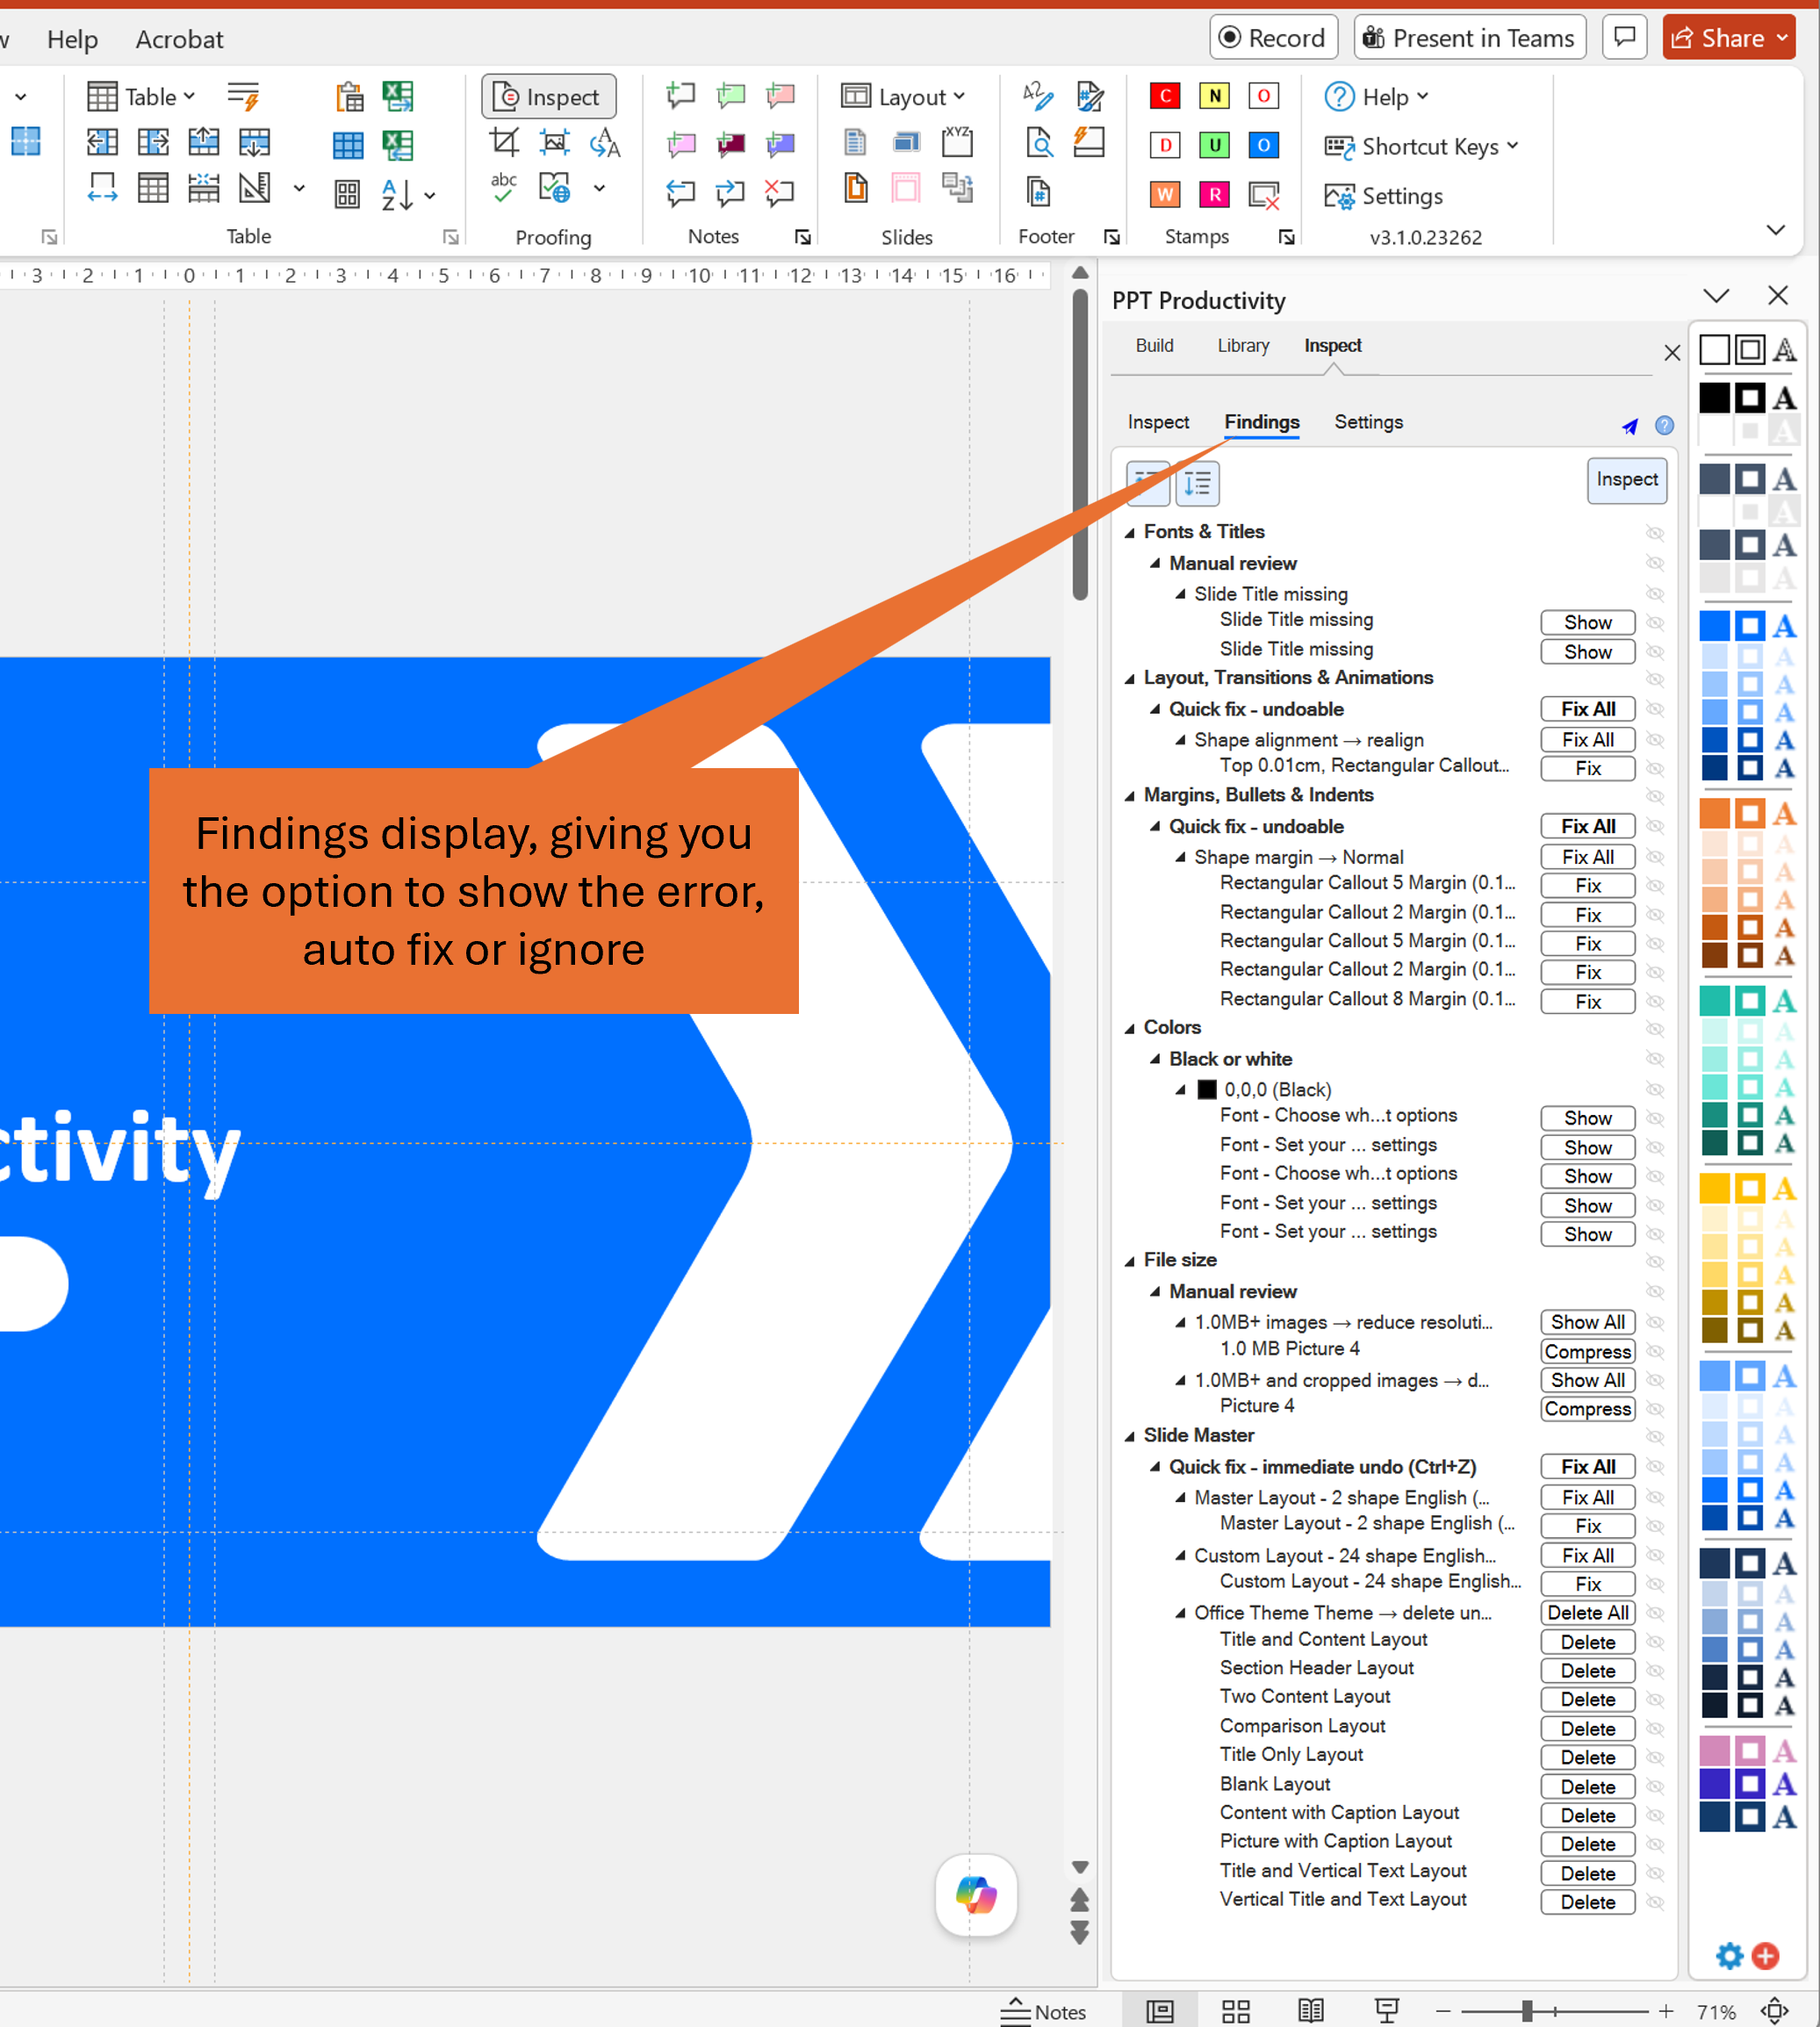
Dit verdient een speciale vermelding, omdat het veel mensen verrast. Elke keer dat dia's worden gekopieerd en geplakt van het ene PowerPoint-bestand naar het andere, importeert PowerPoint de Slide Master van het bronbestand in het bestemmingsbestand (stilletjes, op de achtergrond). Na verloop van tijd kan een presentatiebestand Slide Masters van vier of vijf verschillende oude sjablonen verzamelen. Deze toegevoegde Slide Masters worden meestal niet eens opgemerkt tijdens normaal bewerken, maar ze blazen de bestandsgrootte op en creëren een constant risico dat oude merk kleuren en lettertypen terugkeren wanneer collega's extra dia's plakken.
De Check Slide Master functie identificeert alle Slide Masters die momenteel in het bestand staan, en markeert ongebruikte voor verwijdering. Voor een post-acquisitie rebranding (waar presentaties meestal zijn samengesteld uit veel verschillende bronnen over jaren) is dit een van de belangrijkste stappen in het opruimproces.
Logo's worden meestal bijgewerkt in PowerPoint door elke instantie op de dia's te vinden en het nieuwe logobestand in te voegen. In standaard PowerPoint betekent het vervangen van een afbeelding het verwijderen van de oude, het invoegen van de nieuwe en vervolgens handmatig het formaat wijzigen en opnieuw positioneren om overeen te komen.
PPT Productivity's Change Picture from Clipboard sneltoets maakt dit aanzienlijk sneller. Kopieer je nieuwe logo naar het klembord, klik op het oude logo in de dia en gebruik de sneltoets - de nieuwe afbeelding vervangt de oude op precies dezelfde positie en op precies dezelfde grootte. Geen herpositionering vereist.
Vergeet niet dat voor presentaties waar het logo op elke dia verschijnt via de Slide Master, het bijwerken van de master de meest efficiënte aanpak is. Maar in de echte wereld zijn veel logo's in oudere presentaties direct op dia's geplaatst in plaats van in de master. Als je niet de tijd hebt om dit te corrigeren en gewoon snel de presentatie moet bijwerken, dan is de Change Picture from Clipboard optie een aanzienlijke tijdbesparing.
Overgenomen bedrijfs presentaties en presentaties die door veel bewerkingsrondes zijn gegaan, hebben vaak opsommingstekens en alinea opmaak die handmatig zijn ingesteld, in plaats van geërfd van een sjabloon. Je zult waarschijnlijk een mix van verschillende opsommingstekens, inconsistente inspringniveaus en variërende regelafstanden vinden in presentaties bij het voltooien van een rebranding oefening. Het toepassen van een nieuw sjabloon lost dit niet op.
PPT Productivity's Paragraph Styles functie laat je de opsommingstekens en alinea stijlen van je nieuwe merk opslaan als benoemde presets. Zodra ze zijn opgeslagen, kun je ze gebruiken om snel tekstblokken in je presentatie bij te werken om consistentie over alle dia's te garanderen. Je kunt ook PPT Productivity's aanpasbare sneltoetsen functie gebruiken om aangepaste sneltoetsen in te stellen voor het toepassen van elke opsommingsteken opmaak/alinea stijl.
Zodra je je voorkeursstijlen hebt ingesteld, kun je ze opnemen in de Share Custom Settings export zodat collega's dezelfde stijlen direct beschikbaar hebben.
Zodra je de rebranding van je kern presentaties hebt voltooid, is de beste manier om te voorkomen dat het oude merk terugkomt, je team een bibliotheek van vooraf goedgekeurde, on-brand dia's en vormen te geven om mee te werken.
Dit is belangrijker dan het vroeger was. Microsoft heeft de PowerPoint Reuse Slides functie begin 2026 stopgezet, waardoor de ingebouwde optie die gebruikers in staat stelde om dia's uit andere presentaties te bladeren en te importeren via een zijbalkpaneel, is verwijderd. Het aanbevolen alternatief van Microsoft is simpelweg kopiëren en plakken tussen open presentaties - wat betekent dat er nu nog minder binnen standaard PowerPoint is om teams te helpen goedgekeurde dia's consistent te delen en te hergebruiken.
PPT Productivity's Team Slide Bibliotheek vult die leemte goed op. Het laat je goedgekeurde dia's en vormen opslaan in een centrale bibliotheek die alle teamleden direct vanuit PowerPoint kunnen openen. De bibliotheek kan worden gesynchroniseerd met de Dropbox, Box of OneDrive map van je bedrijf, zodat het altijd up-to-date is voor iedereen.
Een belangrijke functie voor rebranding: wanneer een dia of vorm wordt ingevoegd vanuit de bibliotheek met het "gebruik bronopmaak" selectievakje uitgeschakeld, wordt het automatisch opnieuw gekleurd om overeen te komen met het sjabloon dat momenteel in gebruik is. Dit betekent dat dia's in de bibliotheek zich automatisch aanpassen aan het nieuwe merk sjabloon wanneer teamleden ze in nieuwe presentaties invoegen.
Voor grotere teams die een rebranding ondergaan, denken we dat dit een game changer is - in plaats van dat iedereen zijn eigen (inconsistente) updates maakt aan oude dia's, halen ze vooraf goedgekeurde versies direct uit een centrale bibliotheek.
Voordat je een gerebrande presentatie finaliseert en distribueert, is het de moeite waard om een laatste controle uit te voeren met Proofing Tools' Check Content functie. Dit scant op items die gemakkelijk te vergeten zijn, waaronder:
Het vangen van deze voordat de presentatie wordt verzonden, voorkomt de schaamte van het distribueren van een presentatie met een "DRAFT - OLD BRAND" stempel die nog steeds op dia 14 staat.
Hier is een voorgestelde end-to-end workflow voor het rebranden van een PowerPoint-presentatie met behulp van PPT Productivity:
Alle functies die in dit artikel worden beschreven, zijn opgenomen in PPT Productivity en zijn beschikbaar tijdens de gratis proefversie van 30 dagen - geen creditcard vereist. Als je deze tools in actie wilt zien voordat je downloadt, kun je een persoonlijke demo boeken met een van onze teamleden.
Als je PPT Productivity uitrolt over een team als onderdeel van een rebranding project, neem contact met ons op om team implementatie opties en onboarding ondersteuning te bespreken.

Start uw gratis proefperiode van 30 dagen - Microsoft Office voor Windows
Start gratis proefperiode
Bestaande klanten kunnen downloaden om op een nieuwe computer te installeren
Installeren